Satisfactory

Satisfactory

111 értékelés
Satisfactory Speedrun
Készítő: satisfacultist
Fastest way to complete all milestones in the game (+RUS version)
7
3
2
4
2
2
   
Díjazás
Kedvenc
Kedvenc
Törlés
Introduction
Hello, factory builders!

In this guide I will show you a very efficient way of building the factory.
This Approach allows not to reconstruct the factory over and over and not to remove manufacturing buildings that were already built.
Using this Approach you will save a lot of time and your factory will be very compact on the plane.

In short, there are 3 Key Advantages of the Approach:
  • You will always know where to build new building
  • You can easily turn off any building and release resources and energy it was using
  • You can change output resource type of any building on the fly

Here is a link to a video guide that contains all materials in detail:

ENG and RUS SUBTITLES Available
Below is a summary of this video guide.
(Some tips and details are not presented in text version.)
First steps
What we start with is a conveyor belt which is producing iron ingots.
And what we do is placing constructors along the conveyor belt using splitters.
This constructors will produce iron plates or iron rods:


Let's say, we have a conveyor belt producing sixty iron ingots per minute and three constructors.
First is making iron plates, the second and the third - iron rods:


The key point here is that we'll not put plates and rods on the same conveyor belt.
Each type of resource will be placed on its own layer, one above the other:

We put plates on layer 1 and rods on layer 2.

For now we just store all resources in the storages.
Resources of each layer are stored in its own storage:
Using resources instead of just storing them
Now let's not only store iron plates and iron rods but also use them to construct new things!

We place two new constructors that will produce screws and consume part of iron rods:Now we store eighty screws per minute and ten iron rods per minute instead of thirty.
Because twenty rods are now used in making screws.

This is how it looks like in the game:

First row of constructors produce iron plates and iron rods and put them each on their own layer.
These layers stretch along new constructors that produce screws and that take iron rods from layer 2.
All resources that was not used by screws constructors move to the storages.
Screws are placed on the third layer of the factory.
Inner storage of buildings
On a scheme screws constructors take 10 iron rods per minute.

Pic .1.

But that's because their inner storages are fully filled. (each constructor can keep up to 200 iron rods inside).
If your constructors are empty, that's what will happen initially:

Pic. 2.

First constructor will get 15 rods p/m (per minute ) and second - 7.5 rods p/m because splitters split resources equally.
First constructor will collect 5 extra rods per minute because it uses only 10 rods per minute to produce 40 screws per minute.
After 40 minutes it's inner storage will be fully filled. And it won't be able to get more than 10 iron rods per minute.
And we will get situation shown on Pic. 1. (But after 40 minutes only)
So I recommend to fill every constructor's inner storage initially as it is built and not to wait for it to be filled.
For that you will have enough resources collected if using this guide.
In this guide all buildings on schemas are fully filled.
First Key Advantage of the Approach
So, the first row of constructors is the first level of the factory.
It consumes iron ingots and produces iron plates and iron rods - first level resources.


Second row of constructors is the second level of the factory.
It can consume first level resources. The only type of resource can be created from first level resources is screw.
Screws are second level resources.


As you can see, the main direction in which the factory will significantly expand is direction along each level:


This is very convenient because for each level you will always have a place to add a new building if you need to. This is a First Key Advantage of the Approach.

To be always sure you will have enough space I recommend to find the edge of the mountain and build a big platform for the factory across the abyss using foundations.
Adding level three
Now let's add the third level of the factory.
It will produce resources that can be crafted only using resources from any of the previous levels: 1 and 2.
There are two types of resources like that: reinforced iron plates and rotors.
For now let's just add an assembler, producing reinforced iron plates:

To produce five reinforced iron plates per minute we need to take sixty out of hundred twenty screws per minute and thirty out of sixty iron plates per minute.
Now I store reinforced iron plates, but half less plates and screws.

This is how it looks like in the game:
We have three conveyor belts with three types of resources.
Assemblers take resources they need from any of three layers.

And then they put made resources on new layers.
Reinforced iron plates are put on layer four.
Second Key Advantage
The second key advantage of the Approach is:
If you don't want to produce some type of resource anymore and you want to release all resources that were used to produce it, you just turn off the building that produces it. Released resources will be stored or used in next buildings on this or next levels.

In relation to our scheme, if we don't want to produce reinforced iron plates anymore and we want to store iron plates and iron rods, used in reinforced iron plates assembler, we just turn off this assembler.

All you need to do in the game for that is just to remove conveyor belts, connecting assembler and main conveyor belt.
Or you can just turn off the assembler. This is a better way because you can do it remotely using power switches and you don't have to recreate connecting removed conveyor belts.
But I recommend to switch building's power off only if it's inner storage is fully filled. Otherwise you calculations won't be correct until it get fully filled first.

You can do it with any building(s) and release resources and energy that it(they) was(were) using.

This is very useful because if you have a reinforced iron plates assembler, built in the traditional way, and you don't want to produce reinforced iron plates anymore, all these buildings and conveyor belts become useless and resources produced here get stuck. And you will have to transport all stuck resources to other buildings using conveyor lifters or something.


We can imagine adding buildings on levels as adding pipes that convert one resources to another like that:

it's very clear then that all that needs to be done to release resources used in the pipe is just to remove the pipe.
Third Key Advantage
There is one more key advantage that follows from the second one.
As we can easily turn off constructors and assemblers, we can also change their incoming resources and consequently output resources.
In other words - change building's produced resource type.

Let's say we have six assemblers, producing rotors.
What if now I want to produce reinforced iron plates instead of rotors?
I switch the type of some first level constructors from iron rod to iron plate and type of assemblers from rotor to reinforced iron plate.
Also I turn off some constructors I don't need anymore.


Before using the Approach if I had six rotor assemblers and I wanted to make reinforced iron plates instead. I had to turn off rotor assemblers. Turn on six reinforced iron plate assemblers.
And redirect incoming resources from one assemblers to another.


So I had to have twice more assemblers which take twice more physical space on the ground and also redirect resources from one part of the factory to another.


So, the third Key Advantage of the Approach is the compactness of the factory and the ability to switch resource type of the building on the fly.

Let's have a closer look at this key advantage.
Switching type of first level constructors we don't need to change input resource type.
Because for iron rod and iron plate constructors there is the same input resource - iron ingots.
What differs here is the amount of incoming iron ingots.
We need 15 ingots p/m for the rod constructors and 30 ingots p/m for plates constructor.
Before using the Approach I had to combine conveyor belts in a way that iron rod and iron plate constructors to get different amount of incoming iron ingots.
And if I switched the iron rod constructor to make iron plates it didn't get enough resources.


Using the Approach as we have a single iron ingots conveyor belt and all constructors are fully filled the amount of incoming ingots changes automatically.


Adding Level 3-5 resources
Now let's quickly review adding new types of resources and new levels to our factory.
To add assembler producing rotors to level 3 we need to add five rod constructors and four screw constructors.

Also we have to increase the amount of incoming iron ingots from 135 from the previous schema to 210.
Here is a little tip.
If your current conveyor belt can't carry that much ingots, you can temporarily use a second incoming conveyor belt like that.
Let's finally add a new level to our factory: level 4.

To make 2 Modular Frames per minute we add 2 plates constructors and 1 reinforced iron plate assembler.

Now let's add one more level: level five:

To make 5 versatile frameworks per minute we add 3 rod constructors, 2 screw constructors, 1 reinforced iron plate assembler and 2 modular frame assemblers.
Also we need sixty steel beams per minute.
Outsource conveyor belt
As you could notice, the approach shown in this guide describes an hierarchy of resources, at first place produced from iron ingots.
But what if I need to get other types of resources that weren't made on our factory but are required here? (Let's call resources produced not from iron ingots outsource resources)
We use a special conveyor belt that is connected to layer six right before level four of our factory and is carrying all other types of resources.
I put all outsource resources on layer six just as all other resources produced on the factory, except those that are located on first five layers (iron plates, iron rods, screws, reinforced iron plates and rotors).
Having different resources on the same layer I need a way to pick a certain resource for a certain assembler.
For that I use a smart splitter and simply program it to pick certain resource.

To sum up, the outsource conveyor belt is needed to add resources to the factory that werenot produced using base resource type of this factory. (iron ingot for iron factory)
On this factory we produce only resources based on iron.
But this approach can be applied to other base types of resources.
I also use the approach to build other mini-factories based on other types of ingots at the first place.

Here I have a copper based mini-factory. It produces wire and cables that are delivered to the main factory using an outsource conveyor belt.
So different factories that are based on different ingot types exchange produced resources using outsource conveyor belts.
Adding Level 4 remaining resources
There are also level four resources we have not covered yet: smart planting and motor.

To add smart planting we don't need to add more buildings because we have enough resources.
We just take 2 of 4 reinforced iron plates and 2 out of 4 rotors.

To add motors let's add 5 rod constructors, 3 screw constructors and 2 rotor constructors.
"Cut the Line" principle
I used a little hack, called the "Cut the Line" principle, on a previous schema with motors added.
Let's consider first what we'd have on a schema without using the principle.

We'd see that motor assembler works only 50 percent.

Because it consumes only 5 rotors per minute instead of 10.
This is very disappointing because we have exactly 10 rotors right before the splitter.
And we lose half due to splitting.
To avoid it, we must have twice as many resources than we needed before the motor assembler.
(In our case 20 rotors instead of 10)

To have 10 more rotors we need to add:
Three rotor assemblers,
Which actually produce twelve rotors.
To make twelve rotors we need 300 screws and 60 rods.
For 300 screws we need 8 screw constructors.
Which require 80 rods.
Totally, we need 140 rods.
Which require 10 rod constructors.
Which is 150 iron ingots.

And this all is just to add 10 rotors that actually will be just stored.
But what if I don't need to store them?
And no other assemblers use them next.
Why should I waste my time to add these 10 rotors that I don't even need?
Of course I shouldn't and this is where the "Cut the Line" principle comes into play.
If we don't need to store rotors and no one next uses them, we can just cut the conveyor belt of the rotors layer after the motor assembler.

Or you can use a smart splitter if you've unlocked it. Then instead of cutting the conveyor belt you just set up a smart splitter to move forward only rotors overflow. This is a better way because we don't have to keep in mind which line was cut and when to recreate it again.

Using this hack in specific situations we can save a lot of time instead of adding more resources to the factory.
Cut lines will be marked with the X sign on a schema.

Now we see that on the previous schema we used this principle twice to save resources and time.
After the motor assembler with rotors layer(layer 5) and with the last level three assembler with incoming screws.

First Manufacturers
Okay, let's add our first manufacturer to produce a modular engine.
It consumes 2 out of 5 motors per minute and all smart plantings we already have.
The only new resource required is rubber.
We add it to the outsource conveyor belt.

Now let's add the first level 6 resource - adaptive control unit.
One unit requires 1 heavy modular frame and other non iron based resources.
So I need to add only one heavy modular frame manufacturer to the factory which also requires some non iron based resources, 5 modular frames and 100 screws per minute.

As we can see from the previous schema, we already have five modular frames per minute, but there were no screws left to produce heavy modular frames.
So basically as the adaptive control unit was the last iron based resource I needed for the completion of the milestone, I decided to turn off all buildings that I didn't need.
(At that time update 4 was not out yet)

This is how using one of the key advantages of the approach I easily turned off all buildings I didn't need for the current goal and freed a lot of resources.
Also I freed energy that may be used in other parts of the factory.
Update 4 Compatibility
That was the last schema I was going to show you, but during finishing this guide update four has came out
And it brings new things to upgrade the iron based factory.
Let's use some of them one by one.

There is a new level six resource: fused modular frame.
It requires heavy modular frames, aluminium casing and nitrogen gas.

Gas is a new type of resource.
It is provided via pipes just like liquids.
To produce fused modular frames we need to use a new building: Blender.
Its feature is that it may use fluids or gas along with common resources provided by conveyor belts.

And that is a breaking change for the Approach because before buildings took all resources only from conveyor belts.
Now, to use blender, I had to build another huge platform under the main platform the factory stands on.
I've chosen the distance between factory floors in a way that six stackable pipes could fit there.
If you want you may make the distance between floors bigger or double pipes stack like that.

I suppose that pipes should follow the main conveyor belt on the underground floor.

Then it will be easy for any building to pick specific gas or fluid using pipeline junction cross from any of the pipes on the underground floor:
Pressure Conversion Cubes & Particle Accelerator
Let me introduce the first level seven resource of the factory - pressure conversion cube.
It is produced by assembler which requires fused modular frames and radio control units to produce Pressure Conversion Cubes.

Finally let's add level eight to the factory.
And the first level eight resource is nuclear pasta.
It is produced by another new building: Particle accelerator.
It requires pressure conversion cubes and copper powder to make nuclear pasta.

So, we've discovered all levels avaliable for iron based factory at the time of update 4.
And here is a final scheme of all this levels:
Final
This is the end of the guide.
Thanks for your attention!
Please, check the video guide if you want to get more detailed information.
I skipped some details and tips here.
Here are links to google drive archives with all schemas used in this guide:
JPEG: https://drive.google.com/file/d/1xHVQlv2wMrcdLXKvAVh5YBEPhUqPbz6D/view?usp=sharing
PSD: https://drive.google.com/file/d/1Rce6lBjANdXhIWCb4SvI3V2q4DAJjS2v/view?usp=sharing
Update 1
Dear factory builders!

I got some feedback with the same problem described: when some players follow the Steam guide chapter by chapter they face the problem that they don't have enough conveyor belt power to reproduce some schemas.

Let's have a look at the last schema from "Adding Level 3-5 resources" section:

As you can see the output amount of screws level (level 2) is 360 screws per minute.

But at the moment of making versatile frameworks player may have only the conveyor belt Mk.3 unlocked which is able to carry only up to 270 items per minute.

So this is how this schema looks like with conveyor belt Mk.3 is used:

(note that iron ingots conveyor belt is splitted into two so we can provide more than 270 iron ingots per minute)

As you can see, only the first six screws constructors can produce a full amount of screws and other screws constructors are bottlenecking: screws they produce can't be placed on the conveyor belt because it is fully filled with screws.

The easiest solution is to wait for the necessary amount of resources for the conveyor belt Mk.4 unlocking to be produced with current factory power. (this is what I was doing during my run).

But there is another way I figured out for this case:

Building additional screw layers

In video guide I've mentioned (https://youtu.be/nuNzgw06ews?t=879) (guide timecode 14:39) that all screws required may not fit on layer 3 so it can be a good idea to transfer layer 4 and layer 5 resources (reinforced iron plates and rotors) to layer 6 and put screws on layer 3, 4 and 5. Or build layers 7, 8, etc for screws if you don't want to transfer layer 4, 5 resources.

But the problem is that if following the guide, we don't have layers 4, 5, etc... between level 2 and level 3.
There are only three output conveyor belts on level 2:

So I suggest to build more output conveyor belts on layer two.

Let's have a closer look at the case when we want to use layers 4 and 5 for screws and not to build extra layers (7, 8, etc.).

For that first we need to modify level 3 and 4 of the factory.
As we want to relocate screws to layer 4 and 5, first we need to transfer current layer 4 and 5 resources (reinforced iron plates and rotors) to layer 6. And make all buildings consuming reinforced iron plates and rotors to consume them from new place - layer 6.

Next I will show you steps for doing it in details:
1. Add layer 6 on output lane of third level:
2. Turn off all level 3 rotors and reinforced iron plates assemblers.
3. Switch their output layer to layer 6:
Next few steps will be made on level 4.
As we've transfered reinforced iron plates from layer 4 and rotors from layer 5 to layer 6 we need to change the incoming layer for all buildings on next levels that consume rotors and reinforced iron plates. (It will be demonstrated on level 4. For other levels the same steps required).

Here is a modular frame assembler on level 4. It consumes reinforced iron plates from layer 4 using a conveyor splitter.
Now as reinforced iron plates are located on layer 6 we need to add a smart splitter on layer 6 instead of conveyor splitter (if not smart splitter used already).
So next steps are:
4. Dismantle the conveyor splitter on layer 6 where reinforced iron plates will be taken from (if not smart splitter used already)
5. Build smart splitter (if not smart splitter used already)
6. Reattach adjacent conveyor belts to smart splitter (at the moment of update 5 resources won't go through it otherwise) (if not smart splitter used already)
7. Dismantle the conveyor lift taking reinforced iron plates from layer 4
8. Make new conveyor lift taking reinforced iron plates from layer 6 smart splitter
9. Set up a smart splitter to pick reinforced iron plates.

Repeat steps 4-9 for all other buildings on levels 4+ consuming iron plates and rotors.

10. Turn on all level 3 rotors and reinforced iron plates assemblers.

Then we need to build layers 4 and 5 for level 2 output lane and level 3 input lane

For that we:
11. Add layers 4 and 5 at level 3 input lane.
12. Add layers 4 and 5 on level 2 output lane.
13. switch bottlenecking screws constructors output layer to layer 4 (and layer 5 if layer 4 carries more than 270 screws p/m).
After that step we can see screws are moving on layers 3-5:
And what's left is to take them from new layers, so:
14. Switch incoming screws layer of level 3 assemblers that don't get required amount of screws to layer 4 (and layer 5 if all screws from layer 4 are used in other buildings).

It's enough to use layer 3 and 4 for screws to fix current schema's problem. On screenshots I used layer 5 for screws as a demonstration. Here is a schema of what we really have after using layer 4 for screws at the schema (orange text shows screws layer 4):
As we can see, each screw layer using the conveyor belt Mk.3 can carry screws from 6.75 screw constructors. So adding two layers for screws we can consume 810 screws per minute and use up to 20 screw constructors that scales our factory pretty good at this stage.

So it's up to each player to scale Mk.3 factory by transfering resources or adding layers 7, 8, etc.
Or just wait to unlock Mk.4.

P.S. It is also possible to scale first factory level with iron plates and iron rods if required.
P.P.S. Don't forget to change storages' income source layers if switching layers.


[RUS] Guide below
Вступление
Приветствую!

В этом гайде я покажу очень эффективный способ строительства фабрики.
Он позволяет не перестраивать фабрику раз за разом и не разбирать уже построенные здания.
Используя этот подход, вы сэкономите много времени, и ваша фабрика будет очень компактной.

Вкратце, вот 3 основных преимущества подхода:
  • Вы всегда будете знать где построить новое здание
  • Вы сможете легко отключить любое здание и высвободить ресурсы и энергию, которые были в нём задействованы
  • Вы сможете менять тип производимого ресурса любого здания на лету

У этого гайда есть видеоверсия!
Рекомендую посмотреть её, так как в ней о подходе рассказывается более детально. В видео доступны русские субтитры.
Ниже вы можете ознакомиться с сокращённой версией гайда, где описаны главные особенности подхода. (некоторые детали есть только в видео версии)
С чего начать
Мы начинаем с конвейерной ленты, которая поставляет слитки железа.
И мы размещаем конструкторы вдоль конвейерной ленты с помощью разветвителей.
Конструкторы будут производить железные пластины или железные прутья.


Допустим, у нас есть конвейерная лента, производящая шестьдесят слитков железа в минуту, и три конструктора.
Первый производит металлические пластины, второй и третий - железные прутья.


Ключевым моментом здесь является то, что мы не будем класть пластины и прутья на одну конвейерную ленту.
Каждый тип ресурса будет размещен на отдельном слое один над другим.

Пластины располагаются на первом слое, а прутья на втором.

Пока мы просто храним все ресурсы в хранилищах.
Как видите, ресурсы каждого слоя хранятся в собственном контейнере.
Заставляем ресурсы работать
Теперь давайте будем не просто хранить железные пластины и железные прутья, но и использовать их для создания новых русурсов!

Построим два новых конструктора, которые будут производить винты и потреблять часть железных прутьев:
Теперь мы производим восемьдесят винтов в минуту и ​​десять железных прутьев в минуту вместо тридцати.
Потому что двадцать прутьев теперь используются для изготовления винтов.

Вот как это выглядит в игре:
Первый ряд конструкторов производит железные пластины и прутья и каладёт их каждый на свой слой.
Эти слои тянутся вдоль новых конструкторов, производящих винты и использующих прутья со второго слоя.
Все неиспользованные ресурсы перемещаются в контейнеры.
Винты помещаются на третий слой.
Использование внутреннего хранилища зданий
На схеме конструкторы винтов потребляют 10 железных прутьев в минуту.

Pic .1.

Но это потому что их внутренние хранилища полностью заполнены. (Каждый конструктор может хранить до 200 железных прутьев)
Вот что было бы, если бы конструкторы были пусты:

Pic. 2.

Первый конструктор будет потреблять 15 железных прутьев в минуту, а второй 7.5, потому что разветвитель делит входящие ресурсы поровну.
Первый конструктор будет накапливать 5 прутьев в минуту во внутреннем хранилище потому что для производства сорока винтов в минуту он использует только 10 прутов в минуту.
Через 40 минут хранилище полностью заполнится.
С полным хранилищем конструктор физически не может потреблять больше ресурсов, чем необходимо для текущего производства.
Поэтому мы получим картину, изображенную на рисунке 1. (но только спустя 40 минут)

Поэтому я предпочитаю полностью заполнять все конструкторы и ассемблеры, что упрощает подсчет количества ресурсов, которые мне нужно использовать.
Для этого можно использовать ресурсы, ранее сохранённые в наших хранилищах.
В этом руководстве все конструкторы и ассемблеры полностью заполнены ресурсами.
Первое ключевое преимущество подхода
Итак, первый ряд конструкторов - это первый уровень нашей фабрики.
Он производит ресурсы первого уровня - железные прутья и железные пластины.


Второй ряд конструкторов - второй уровень нашей фабрики.
Он потребляет ресурсы первого уровня.
Единственный ресурс, который может быть произведён из ресурсов первого уровня - это винты. Поэтому винты - ресурсы второго уровня.


Вот основное направление в котором будет расти каждый уровень нашей фабрики


Используя подход, мы всегда знаем где построить новое здание. Это первое ключевое преимущество подхода.

Чтобы всегда быть уверенным, что у вас будет достаточно места, я рекомендую найти обрыв и построить большую платформу для фабрики над пропастью, используя фундамент.
Третий уровень фабрики
Теперь построим третий уровень нашей фабрики.

На нём будут производиться ресурсы, создаваемые с помощью ресурсов со всех предыдущих уровней: 1 и 2. Есть всего 2 таких ресурса: усиленные железные пластины и роторы.
Пока давайте просто добавим ассемблер, производящий усиленные железные пластины.

Чтобы производить пять усиленных железных пластин в минуту, нам нужно брать шестьдесят из ста двадцати винтов в минуту и ​​тридцать из шестидесяти железных пластин в минуту.
Теперь мы производим усиленные железные пластины, но вдвое меньше железных пластин и прутьев.

Вот как это выглядит в игре:

У нас есть три конвейерные линии со своим типом ресурса.
Ассемблеры берут необходимые ресурсы с определенных слоёв.
И складируют произведённые ресурсы на новые слои.

Усиленные желензые пластины помещаются на четвёртый слой.
Второе ключевое преимущество
Второе преимущество подход заключается в следующем:
Если вы больше не хотите производить определенный тип ресурса и хотите высвободить ресурсы, которые использовались для его производства, достаточно просто отключить здание(я), производящее(ие) его. Высвобожденные ресурсы можно будет складировать или использовать дальше в зданиях этого или следующих уровней.

Применительно к нашей схеме, если мы больше не хотим производить усиленные железные пластины, а хотим складировать обычные пластины и прутья, то мы можем просто отключить ассемблер усиленных железных пластин.

Всё что для этого нужно сделать в игре это убрать конвейерную ленту, соединяющую ассемблер и основную конвейерную ленту.
Также можно просто выключить ассемблер. Этот способ удобнее тем, что это можно делать удалённо с помощью рубильника, а также не нужно держать в голове какая лента была перерезана и когда нужно её снова провести. Однако, я рекомендую использывать этот способ только если внутреннее хранилище здания полностью заполнено. В противном случае пока оно не заполнится полностью, подсчёты будут неверны, так как здание будет потреблять больше чем должно пока не заполнит внутреннее хранилище.

Это можно делать с любыми зданиями и высвобождать ресурсы и энергию, которую они использовали.

До использывания подхода, если я строил ассемблер усиленных железных платин традиционным способом и усиленные пластины становились мне не нужны, то все ресурсы, задействованные в их производстве застревали в этой схеме и мне приходилось переносить их в другую часть фабрики, используя конвейерные подъёмники.

Можно представить добавление зданий по-другому: здания можно рассматривать как конвертеры, преобразующие ресурсы одного типа в ресурс другого типа, которые добавляются на определенный уровень

Так наглядно видно, что для высвобождения ресурсов, проходящих через конвертер, достаточно убрать конвертер.
Третье ключевое преимущество
Из второго преимущества следует еще одно:

Поскольку мы можем легко отключить конструкторы и ассемблеры, мы также можем изменить их входящие ресурсы и, следовательно, выходные ресурсы.
Дргуими словами, изменять тип ресурса, производимого зданием.

Допустим, у нас есть шесть ассемблеров, производящих роторы.
Что, если теперь я захочу изготавливать усиленные железные пластины вместо роторов?
Я переключаю тип некоторых конструкторов первого уровня с железного прута на железную пластину, а тип ассемблеров с ротора на усиленную железную пластину.
Также я отключаю некоторые конструкторы, которые мне больше не нужны.


До использования подхода, если бы у меня было шесть ассемблеров роторов и я бы захотел изготавливать усиленные железные пластины, мне пришлось бы отключать ассемблеры, производящие роторы, включать шесть ассемблеров с усиленными железными пластинами и перенаправлять ресурсы от одних ассемблеров к другим.

Мне пришлось бы иметь в два раза больше ассемблеров, которые занимают в два раза больше места на земле, а также перенаправлять ресурсы из одной части фабрики в другую.


Итак, третье ключевое преимущество подхода - компактность фабрики и возможность изменения производимого зданием ресурса на лету.

Давайте подробнее рассмотрим это ключевое преимущество.
При переключении типа конструктора первого уровня нам не нужно менять тип входного ресурса.
Потому что у конструкторов железных прутьев и железных пластин один и тот же входной ресурс - железные слитки.
Различно здесь количество поступающих слитков железа.
Необходимо 15 слитков в минуту для конструктора прутьев и 30 слитков в минуту для конструктора пластин.
До использование подхода мне приходилось комбинировать конвейерные ленты таким образом, чтобы конструкторы железных прутьев и железных пластин получали разное количество поступающих слитков железа.
И когда я заменял тип конструктора железных прутьев на железные пластины, ему не поступало достаточное количество ресурсов ресурсов.


Используя новый подход, поскольку у нас есть одна конвейерная лента для слитков и все конструкторы полностью заполнены, количество поступающих слитков изменяется автоматически.


Подключаем ресурсы 3-5 уровней
Теперь давайте быстро рассмотрим добавление новых типов ресурсов и новых уровней на нашу фабрику.
Чтобы добавить ассемблер, производящий роторы, на уровень 3, нам нужно добавить пять конструкторов прутьев и четыре конструктора винтов.

Также нам нужно увеличить количество поступающих слитков железа со 135 на предыдущей схеме до 210.
Вот небольшой совет: если ваша нынешняя конвейерная лента не может вместить такое количество слитков, вы можете временно использовать вторую входящую конвейерную ленту таким образом.
Давайте наконец добавим к нашей фабрике новый уровень: четвертый.

Чтобы производить 2 модульных каркаса в минуту, мы добавляем 2 конструктора пластин и 1 ассемблер усиленных железных пластин.

Теперь добавим еще один уровень: пятый.

Чтобы делать 5 универсальных каркасов в минуту, мы добавляем 3 конструктора прутьев, 2 конструктора винтов, 1 ассемблер усиленных железных пластин и 2 ассемблера модульных каркасов.
Также нам нужно шестьдесят стальных балок в минуту.
Внешняя конвйерная лента
Как вы могли заметить, используемый подход описывает иерархию ресурсов, в первую очередь производимых из железных слитков.
Но что, если мне нужно получить другие типы ресурсов, которые не производились на нашей фабрике, но требуются здесь? (Назовём ресурсы, произведённые без участния железных слитков внешними ресурсами)
Мы используем специальную конвейерную ленту, которая подключена к шестому слою прямо перед четвертым уровнем нашей фабрики и переносит все другие типы ресурсов.

Я помещаю все внешние ресурсы на 6 слой. Так же, как и все остальные ресурсы, производимые на фабрике, кроме тех, что расположены на первых пяти слоях. (железные пластины и прутья, винты, усиленные железные пластины и роторы)

Имея разные ресурсы на одном уровне, мне нужен способ выбрать определенный ресурс для определенного ассемблера.
Для этого я использую умный разветвитель и просто программирую его на выбор определенного ресурса.

Итак, внешняя конвейерная лента необходима для добавления ресурсов на фабрику, которые не были произведены с использованием базового ресурса этой фабрики. (железные слитки для железной фабрики)
На этой фабрике мы производим только ресурсы на основе железных слитков.
Но этот подход можно применить и с другими базовыми типами ресурсов.
Я также использую этот подход, чтобы построить другие мини-фабрики, которые основываются на слитках других типов.

Это медная мини-фабрика, которая производит проволоку и кабели, которые поступают на основную фабрику по внешней конвеерной ленте.

Таким образом, фабрики c разными базовыми ресурсами могут обмениваться ресурсами друг с другом посредством внешних конвеерных лент.
Оставшиеся ресурсы 4 уровня
У нас остались ресурсы четвертого уровня, которые мы еще не рассмотрели: умная обшивка и мотор.

Чтобы добавить умную обшивку, нам не нужно добавлять больше зданий, потому что у нас достаточно ресурсов.
Мы просто берем 2 из 4 усиленных железных пластин и 2 из 4 роторов.

Чтобы добавить мотор, добавим пять конструкторов прутьев, 3 конструктора винтов и 2 конструктора роторов.
Хитрость с перерезанием ленты
На предыдущей схеме с добавлением мотора я использовал небольшую хитрость.
Давайте сначала рассмотрим как выглядела бы схема, не используй я её:

Получилось бы, что ассемблер моторов работал бы вполсилы:

Так как он потребляет всего 5 роторов в минуту вместо 10.
Это очень обидно, потому что прямо перед разветвителем у нас есть ровно 10 роторов.
А половину мы теряем из-за разделения.

Чтобы этого избежать, у нас должно быть вдвое больше ресурсов, чем нужно перед ассемблером моторов (20 роторов вместо 10-ти).

Чтобы добавить еще 10 роторов, нам нужно добавить.
Три ассемблера роторов.
Которые производят двенадцать роторов.
Для изготовления двенадцати роторов нам понадобится 300 винтов и 60 прутьев.
Для 300 винтов понадобится 8 конструкторов винтов.
Для чего потребуется 80 прутьев.
Всего нужно 140 прутьев.
Для чего требуется 10 конструкторов прутьев.
Что есть 150 железных слитков.

И все это для того, чтобы добавить 10 роторов, которые фактически будут просто складироваться.
Но что, если мне не нужно их хранить?
И никакие другие ассемблеры не будут использовать их дальше.
Почему я должен тратить время на добавление этих 10 роторов, которые мне даже не нужны?
Конечно, не должен, и вот где вступает в игру хитрость с перерезанием ленты.
Если нам не нужно хранить роторы и никто не будет ими пользоваться, мы можем просто перерезать конвейерную ленту слоя роторов сразу после ассемблера моторов.

Или, если в нашем распоряжении есть умный разветвитель, мы можем использовать его вмето перерезания ленты, просто настроив его таким образом, чтобы дальше продвигался только излишек роторов. Этот подход лучше потому что не требует держать в голове какие ленты мы перерезали и когда нужно их восстановить.

Используя этот прием в определенных ситуациях, мы можем сэкономить много времени вместо того, чтобы добавлять дополнительные ресурсы.
Перерезанные линии будут отмечены на схеме знаком X.

Теперь мы видим, что на схеме с добавлением мотора мы использовали эту хитрость дважды для экономии ресурсов и времени: после ассемблера моторов с пятым слоем (слоем роторов) и с последним ассемблером третьего уровня с винтами.

Первые изготовители
Хорошо, давайте добавим первый изготовитель для производства модульного двигателя.
Он потребляет 2 из 5 двигателей в минуту и ​​все умные обшивки, которые у нас уже есть.
Единственный требуемый новый ресурс - это резина.
Добавляем её на внешнюю конвейерную ленту.

Первым ресурсом шестого уровня, который мы добавим на нашу фабрику будет адаптивный блок управления.
Для одного блока требуется 1 тяжелый модульный каркас и другие ресурсы, основанные не на железе.
Поэтому нужно добавить только один изготовитель тяжелых модульных каркасов, для чего также требуются ресурсы, не основанные на железе, пять модульных каркасов и сто винтов в минуту.

Как видно из предыдущей схемы, у нас уже есть пять модульных каркасов в минуту, но нет доступных винтов.
Поэтому поскольку адаптивный блок управления был последним ресурсом на основе железа, который мне было необходимо произвести для завершение цели (в этот момент ещё не вышло обновление 4), я решил отключить все здания, которые мне не нужны и производить только адаптивные блоки управления.

Таким образом, используя одно из ключевых преимуществ подхода, я легко отключил все постройки, которые не были мне нужны для текущей цели, и высвободил много ресурсов.
Также я высвободил энергию, которую можно использовать в других частях фабрики.
Совместимость с Обновлением 4
Это была последняя схема, которую я собирался вам показать, но в процессе завершения этого гайда вышел червёртый апдейт игры.

И это внесло новые вещи для фабрики основанной на железе.
Давайте рассмотрим некоторые из них по очереди.

Появился новый ресурс шестого уровня: сплавленный модульный каркас.
Для него требуются тяжелые модульные каркасы, алюминиевый корпус и газообразный азот.
Газ - это новый вид ресурса.
Он подается по трубам, как и жидкости.
Для изготовления сплавленных модульных каркасов нам нужно использовать новое здание: Blender.
Его особенность в том, что он может использовать жидкость или газ наравне с другими ресурсами, поставляемыми конвейерными лентами.

И это серьезное нововведение для подхода, потому что раньше здания забирали все ресурсы с конвейерных лент.
Теперь, чтобы использовать блендер, мне пришлось построить еще одну большую платформу под основной платформой, на которой стоит фабрика.
Я выбрал расстояние между этажами фабрики таким образом, чтобы туда поместилось шесть слоёв труб.
При желании можно увеличить расстояние между этажами или поставить двойные трубы таким образом.
Я полагаю, что трубы должны идти вдоль главной конвейерной ленты по подземному этажу.
Тогда любое здание сможет легко потреблять газ или жидкость с помощью крестовины трубопроводов из любой трубы на подземном этаже:
Кубы преобразования давления и Ускоритель частиц
Позвольте представить первый ресурс фабрики седьмого уровня - куб преобразования давления.
Он производится ассемблером, которому требуются сплавленные модульные каркасы и блоки радиоуправления для изготовления кубов преобразования давления.

Наконец, добавим восьмой уровень фабрики.
И первый ресурс восьмого уровня - это ядерная паста.
Его производит другое новое здание: ускоритель частиц.
Для приготовления ядерной пасты требуются кубы для преобразования давления и медный порошок.

Итак, мы рассмотрели все доступные уровни железной фабрики на момент выхода обновления 4.
Вот схема производства ресурсов на всех воьми уровнях железной фабрики:
Заключение
На этом текстовая версия гайда завершается.
Еще раз напоминаю вам о том, что у гайда есть видео версия с русскими субтитрами.
Ссылки на архивы со всеми схемами, приведёнными в гайде:
JPEG: https://drive.google.com/file/d/1xHVQlv2wMrcdLXKvAVh5YBEPhUqPbz6D/view?usp=sharing
PSD: https://drive.google.com/file/d/1Rce6lBjANdXhIWCb4SvI3V2q4DAJjS2v/view?usp=sharing
Обновление 1
14 megjegyzés
Foxlord48 2022. júl. 15., 14:47 
Why are using Xeno zapper instead of basher?
Typhon Plume 2022. ápr. 27., 19:43 
I've ignored this guide and got better results. Welcome to guides that need updates.
Kikinaak 2021. nov. 13., 11:54 
I'm using a doubled version of this in my current run. 2 splitters or mergers side by side fit in one foundation tile. I make them 5 high then delete the bottom pair. This gives me 8 belts within easy reach from the ground. Removing the bottom most pair lets me use conveyer lifts to bring whichever belt I need to ground level for input/output, going under the stack if I need something from the other side. For building higher stacks, stackable conveyer poles match the height of splitters and come with built in ladders.
NobleFeast 2021. nov. 6., 14:51 
I was thinking the goal was employee of the planet (final space elevator launch) which takes so many resources that this type of approach might be too slow. For the unlocking of the milestones it is different as the number of complex parts is much fewer. I am wondering how fast you were able to do all the milestones?
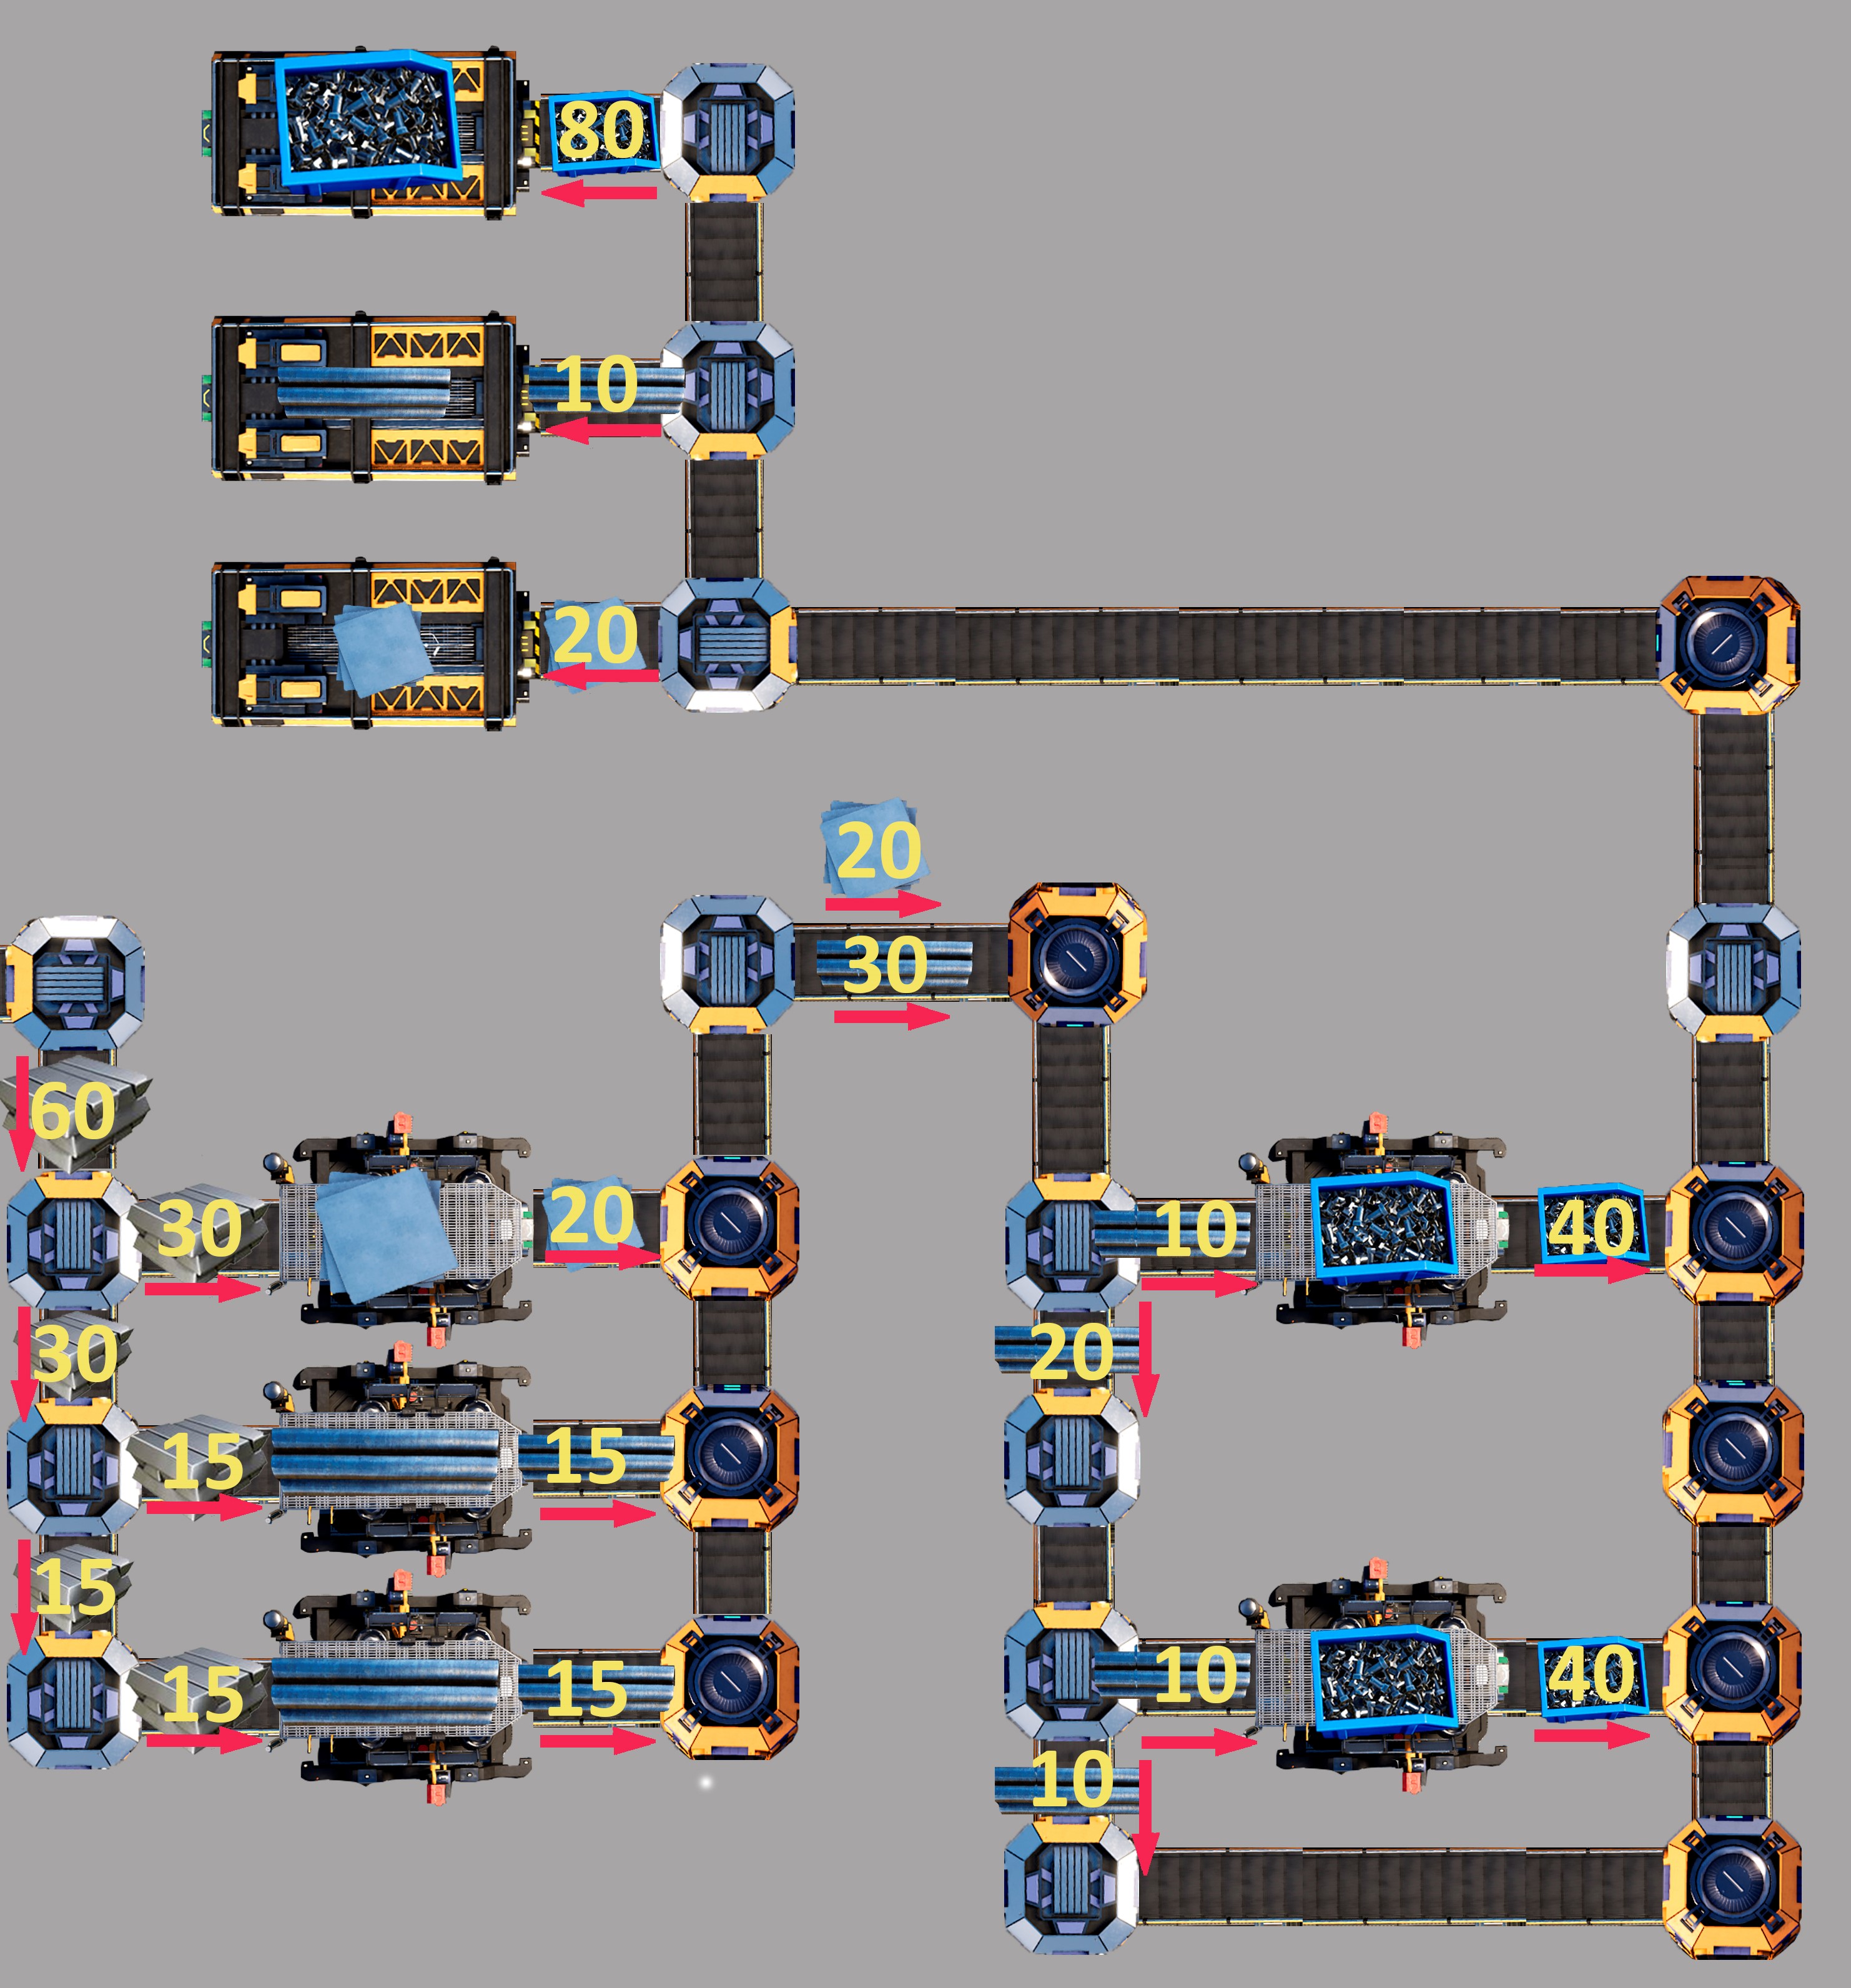
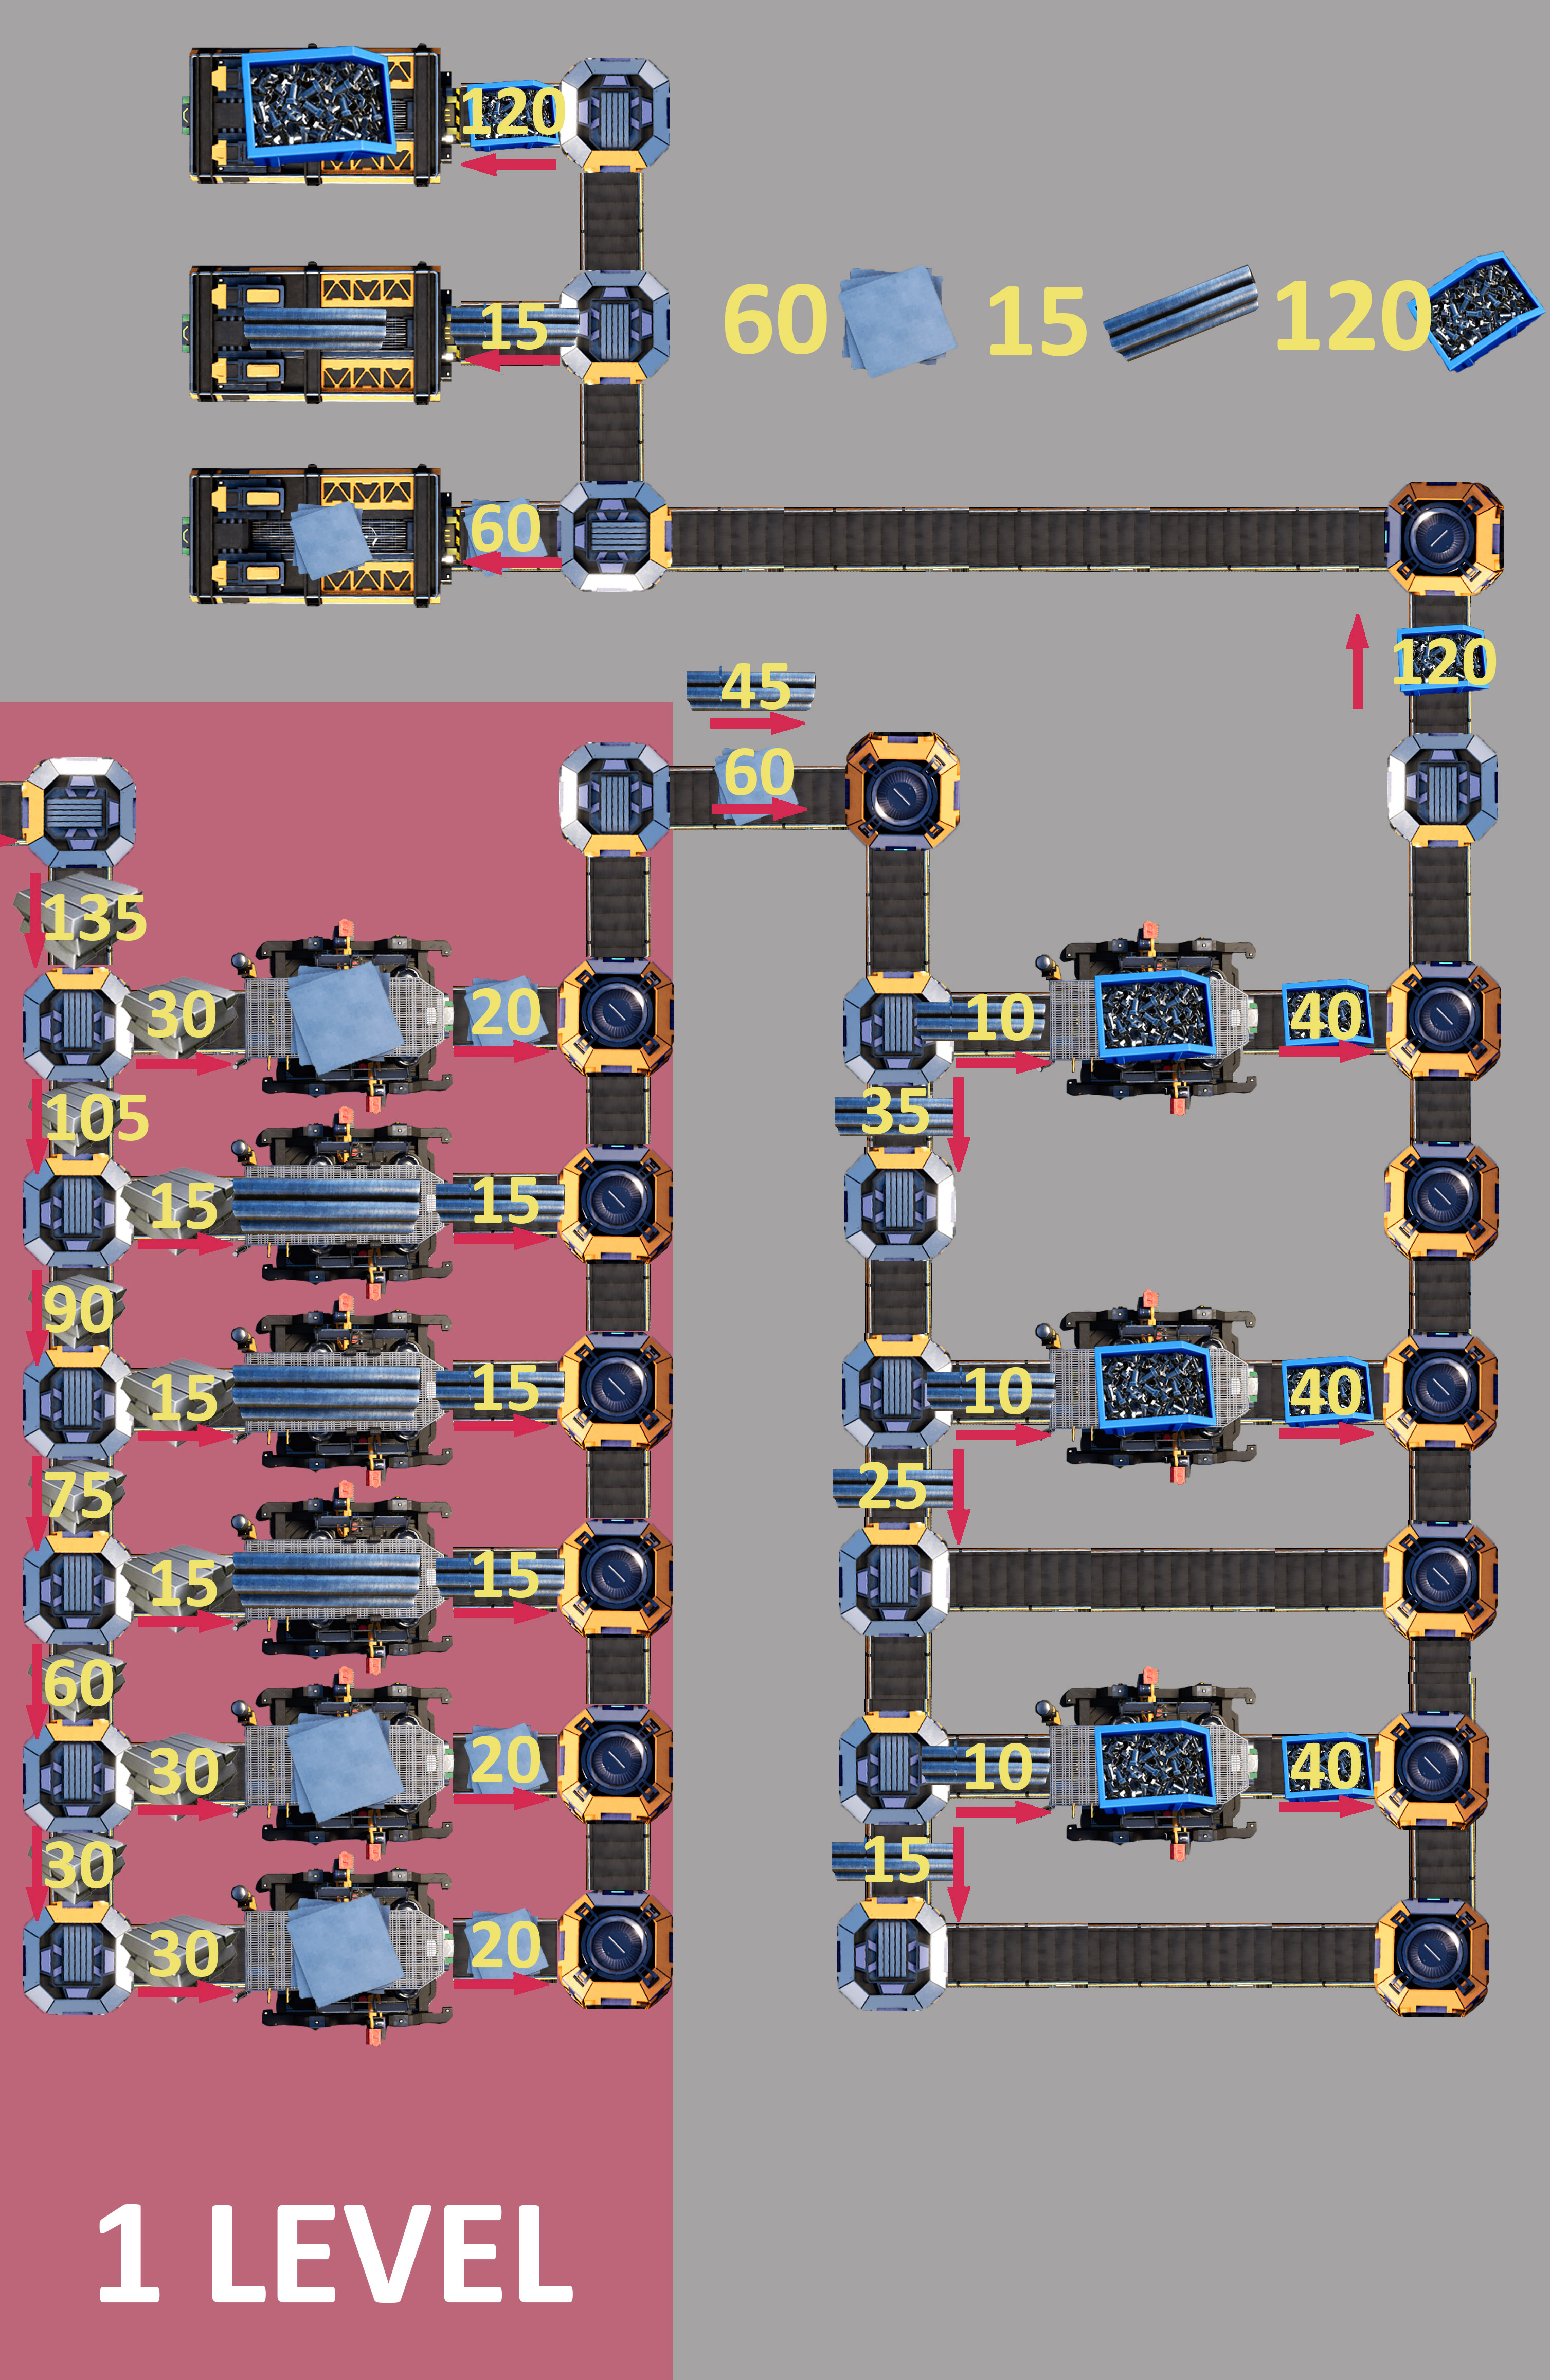
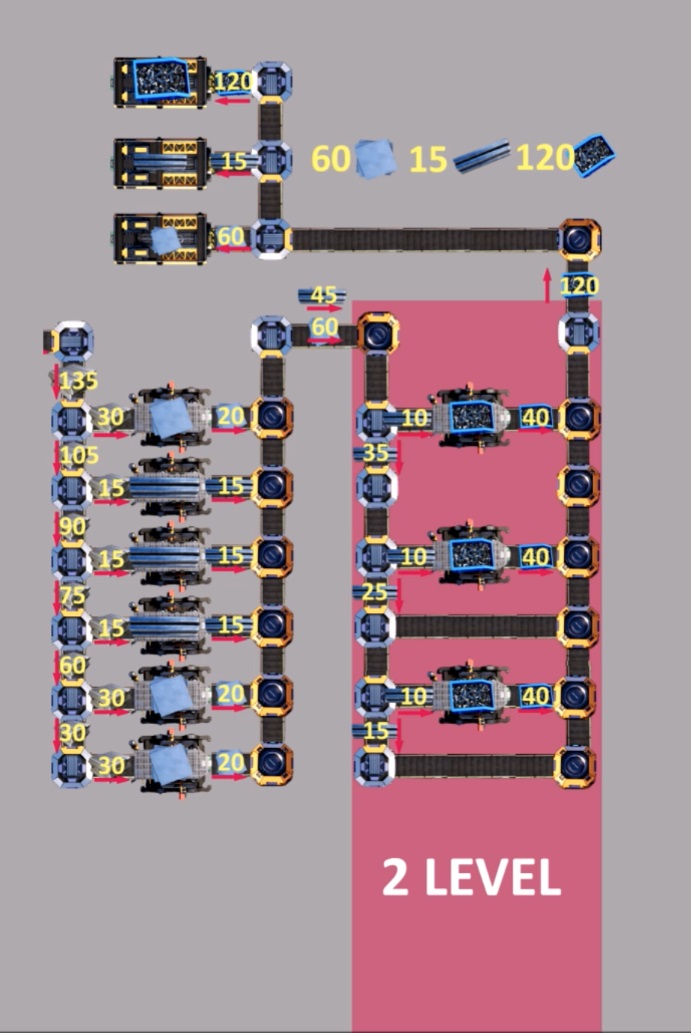
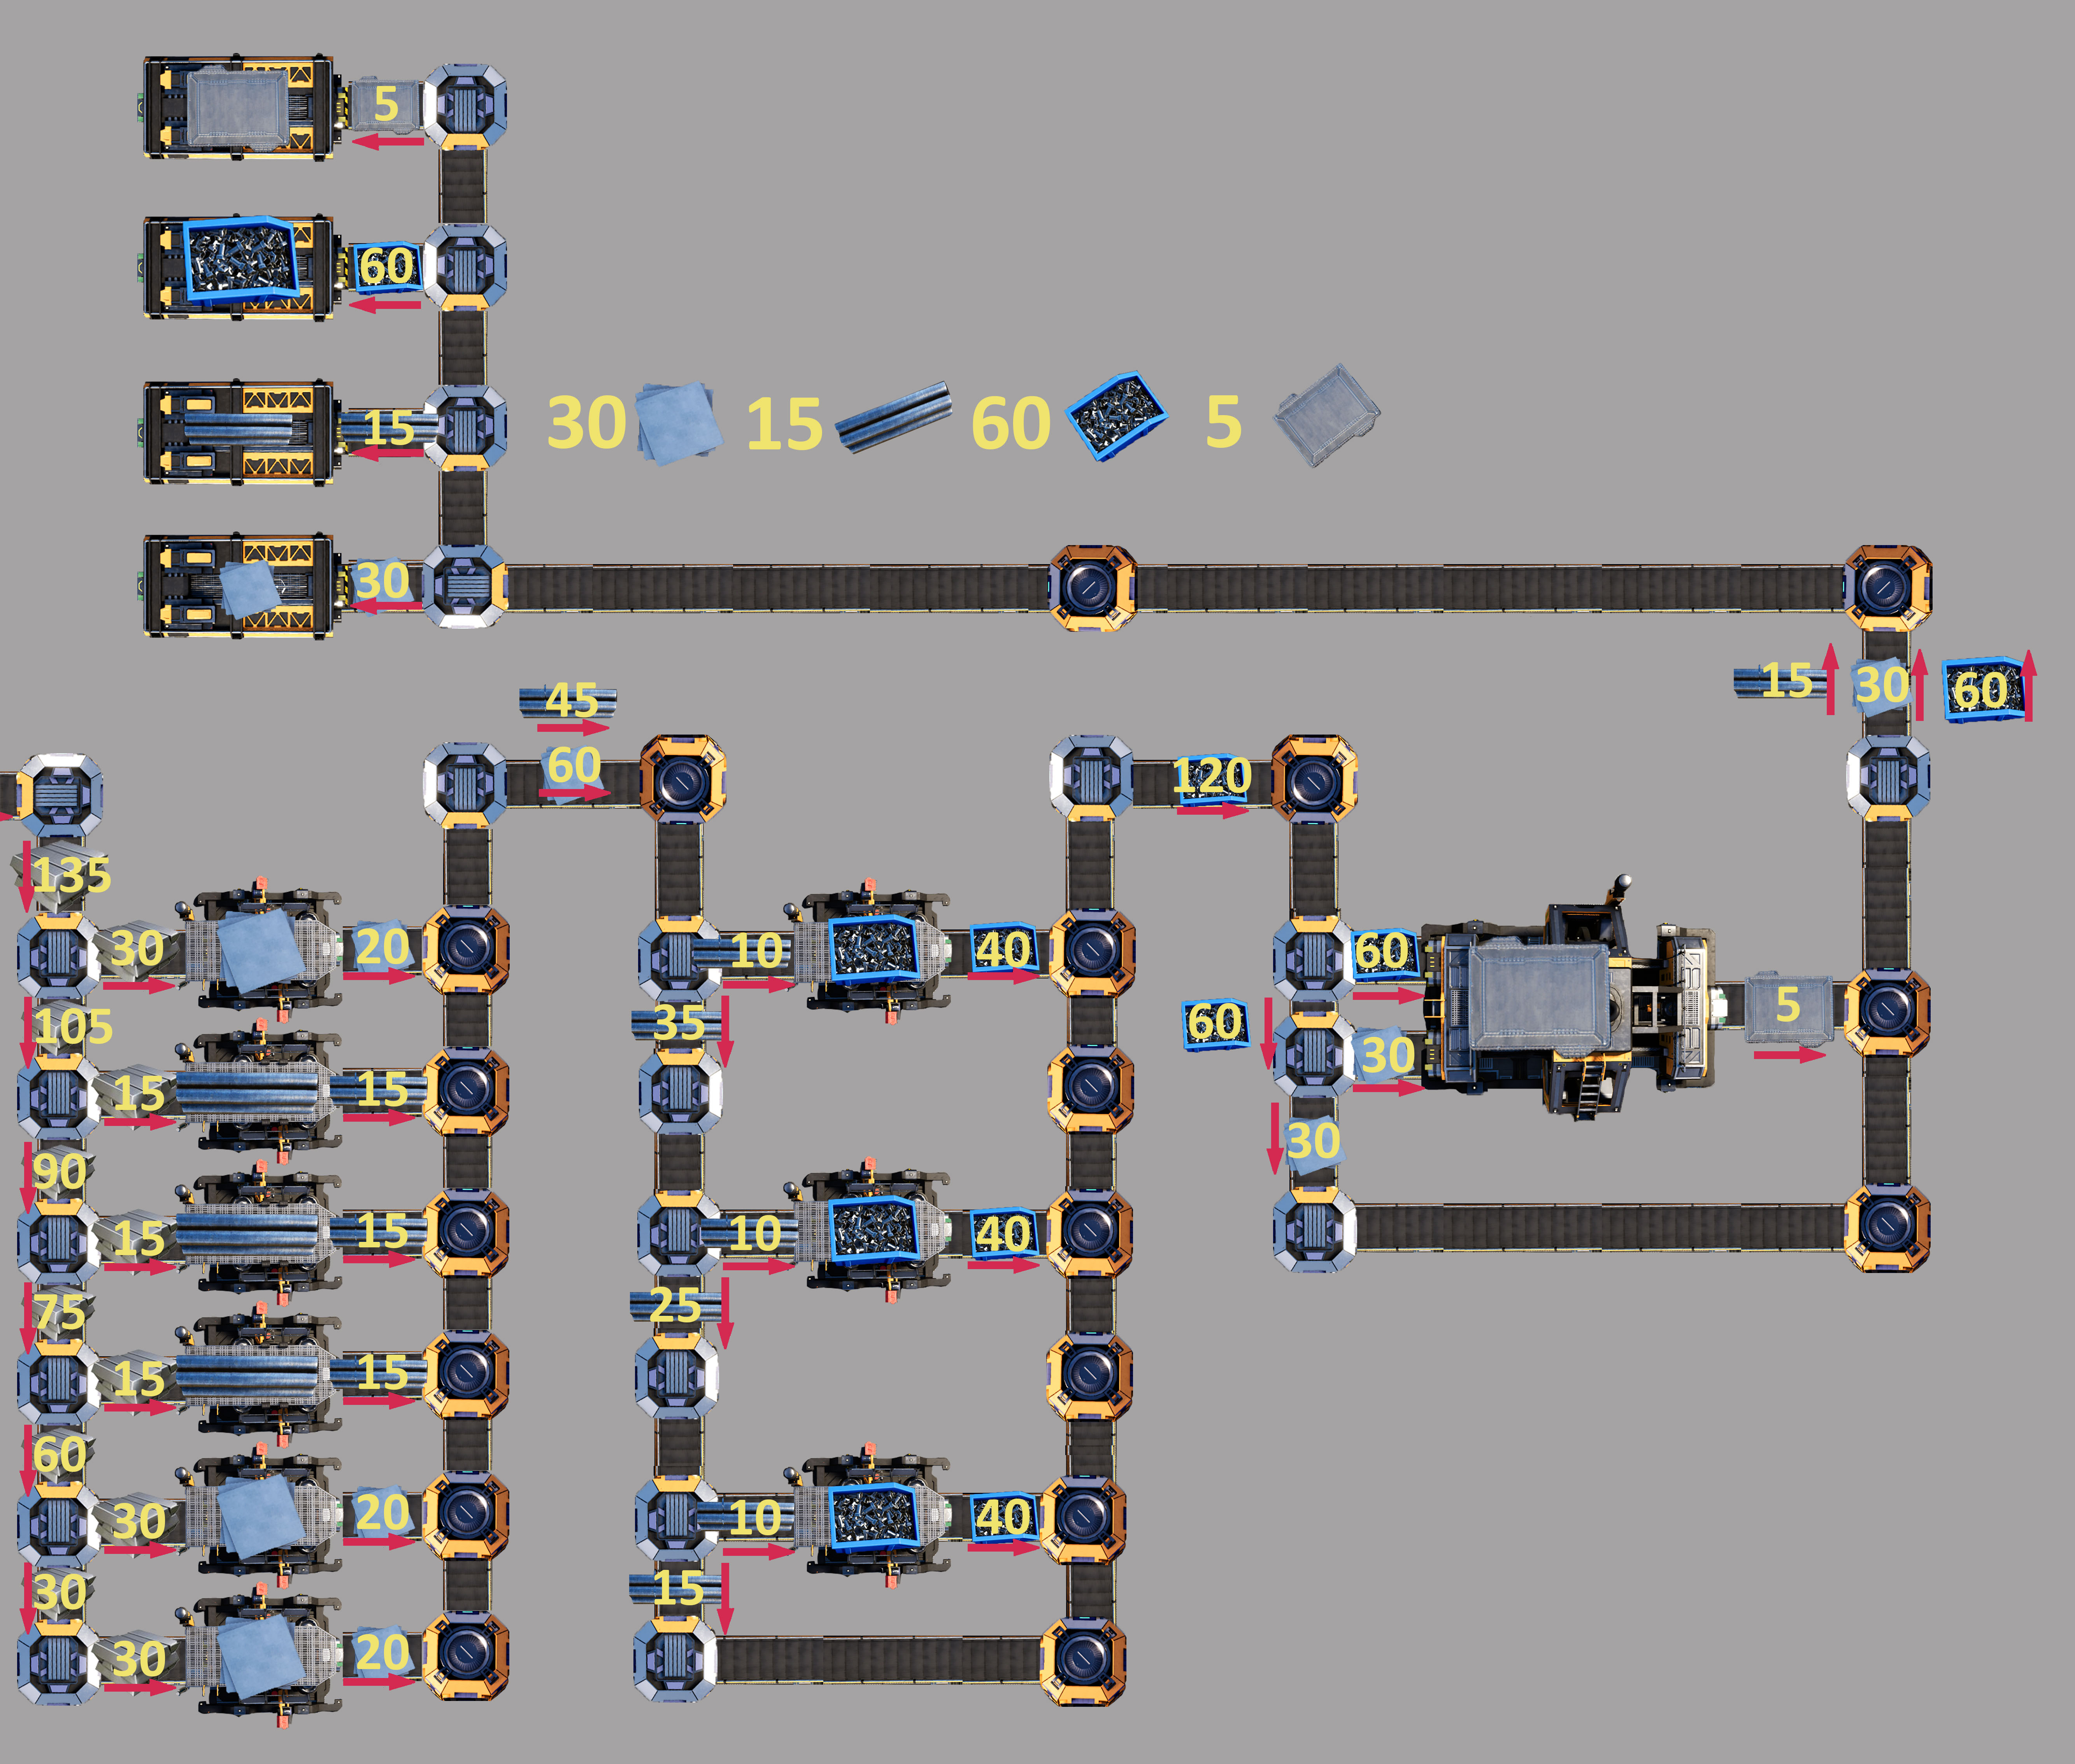
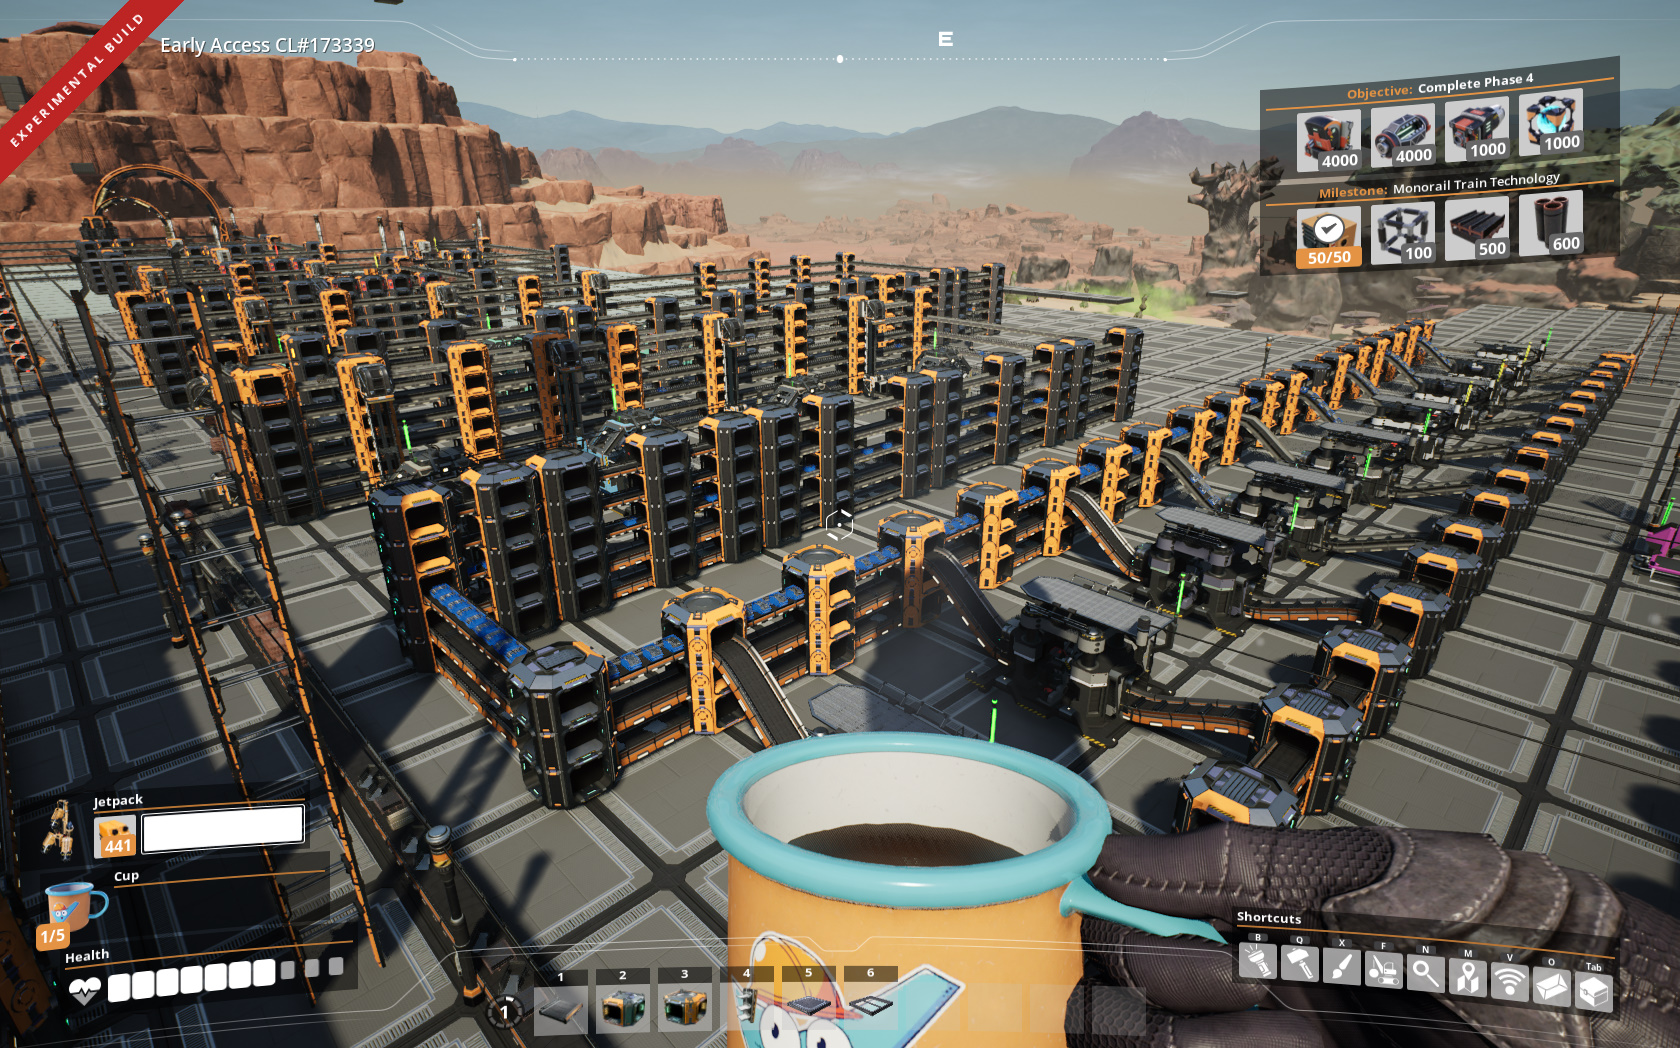
Your system reminds me of the factorio "main bus" design but in factorio there are exceptions on what goes into the main bus. You wouldn't put wire in as the number of items produced is more than the items consumed. In the same way screws in satisfactory. It might be better to make the screws feeding directly into the assemblers.
I don't know if satisfactory can be a good game for a true speedrun as it takes too long and players have a lot more options for goals. For example I wouldn't want to have belts clipping but someone who doesn't mind would be able to build much faster. Still I appreciate your lengthy guide and the ideas you bring.
satisfacultist  [készítő] 2021. nov. 5., 23:06 
And we want it fast. So we turn off unnecessary resource making buildings to focus all factory power on current goals. I’m pretty sure it will be faster to switch some assemblers on a compact factory rather than build a huge factory producing all types of resources, half of which will be collected or exchanged for coupons and provide energy for it (a good practice will be to set up a power switch system to be able to turn on and off different buildings from the same place).

P.S. I don't think this is the only way to play Satisfactory. It's just an approach that suits my playstyle. I want to open everything that milestones give as quickly as possible so I can test it. At the same time, I love to look at grandiose projects of factories that consume all the resources on the map or amaze with their aesthetics and beauty.
Part (6/6)
satisfacultist  [készítő] 2021. nov. 5., 23:06 
You won't even waste time waiting for the factory to produce, for example, enough rotors and reinforced plates, because you have other things to do on the other part of the map with other resource types mini-factories and energy issues. When you return you will have enough rotors and reinforced plates collected to complete a lot of milestones.

3. The guide is called "Satisfactory Speedrun" because it aims to complete all milestones as fast as possible. To do so we can't waste time and resources to build setups where all resource types are produced at same time. Of course it is convenient, but is it worth wasting time and resources to make extra things that won't be used? At a real factory not a single kilowatt of energy and not a single minute of time can be wasted. This corresponds with the ideology of the approach: we must produce only resources required for the current milestone (plus some additional resources for crafting items obtained from milestones). Part(5/6)
satisfacultist  [készítő] 2021. nov. 5., 23:06 
2. And this is a case when it may be helpful to stop producing one iron based type and start making another. If your goal is to get the conveyor belt Mk. 3 as fast as possible you need to complete all milestones in Tier 3 first. For that you can set up your factory to produce the required amount of rotors and reinforced iron plates one by one (or use a hack shown here https://youtu.be/nuNzgw06ews?t=879) and then concentrate all your factory power to generate only the required amount of modular frames to complete Tier 3.
I regard this as an advantage rather than a disadvantage of the approach. Because you will spend less time switching some assemblers production type rather than construct another factory and provide energy and ore to it. Especially considering that after unlocking the Conveyor Belt Mk. 3 the factory will have more possibilities for multi-threaded production (making different resources simultaneously). Part (4/6)
satisfacultist  [készítő] 2021. nov. 5., 23:06 
I must say that the throughput problem takes place because these schemas show the process of making reinforced plates, rotors, frames simultaneously and versatile frameworks (we don’t need versatile frameworks to unlock the conveyor belt Mk.3). There is no need to replicate it exactly. The player may need to produce less resources for the current milestone completion. These schemas demonstrate the capabilities of the approach.
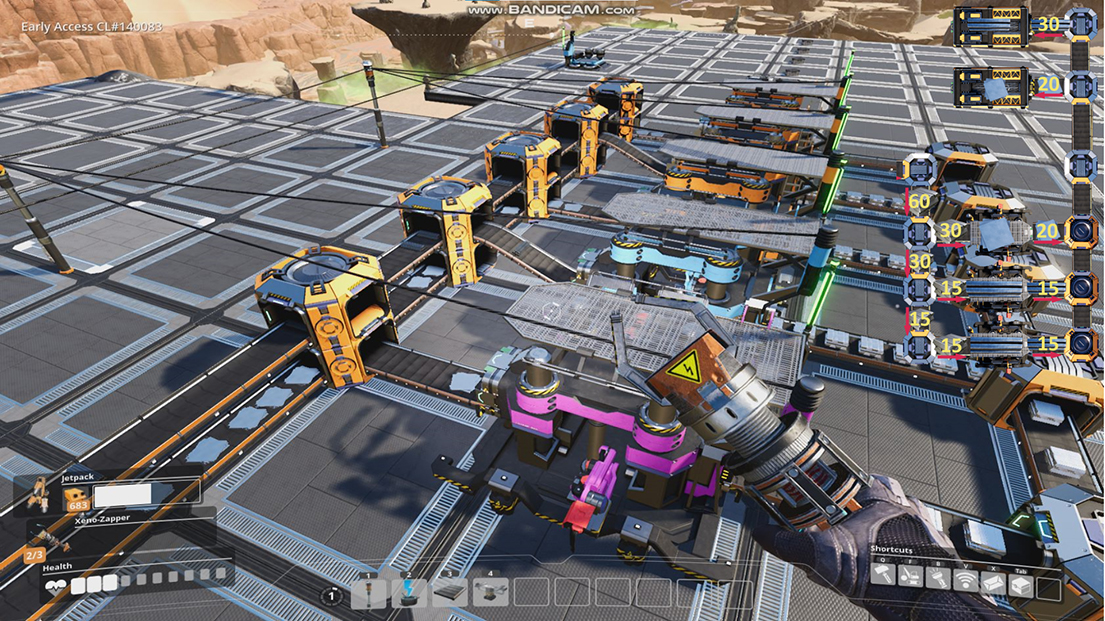
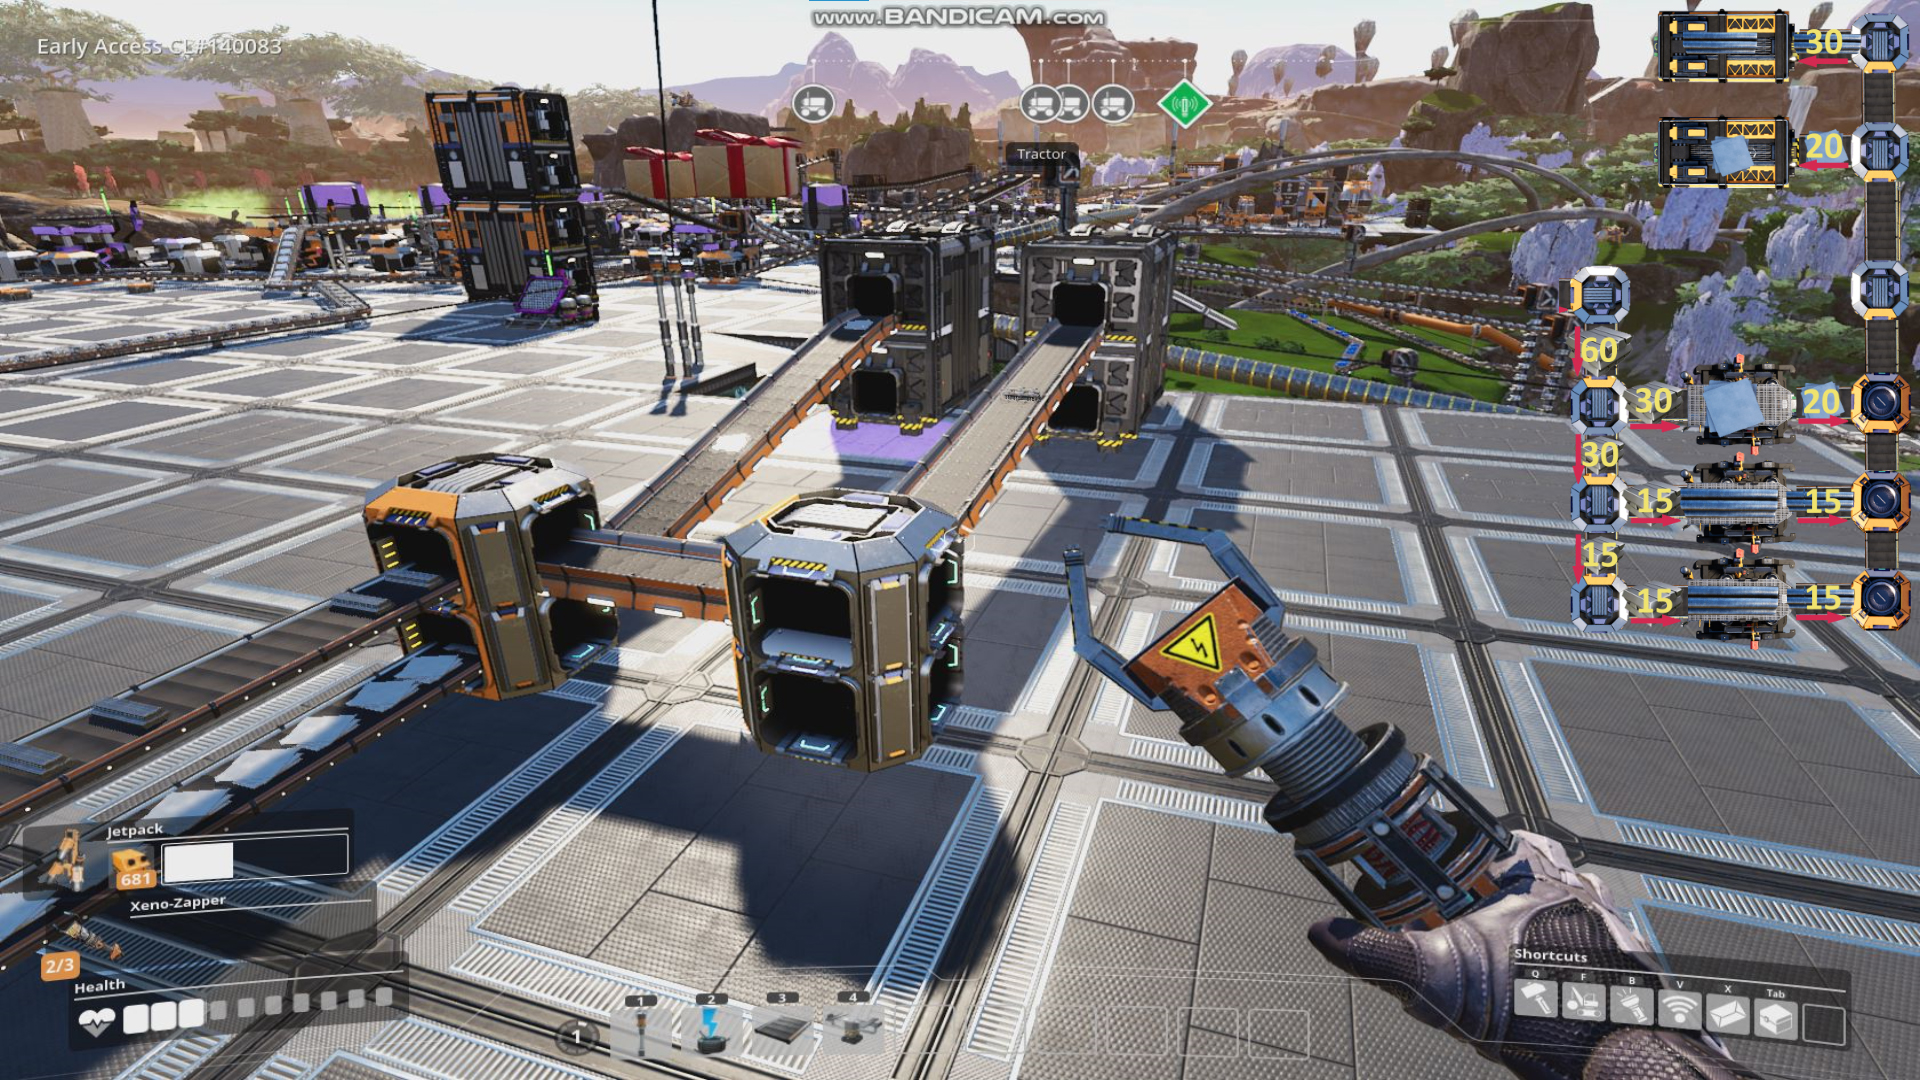
To replicate schemas exactly, players indeed need to get the Conveyor Belt Mk. 3. Part (3/6)
satisfacultist  [készítő] 2021. nov. 5., 23:06 
All schemas presented before the "adding level 3-5 resources" section are realizable using conveyor belt Mk.2 if using a tip shown in schema under phrase "If your current conveyor belt can't carry that much ingots, you can temporarily use a second incoming conveyor belt like that."

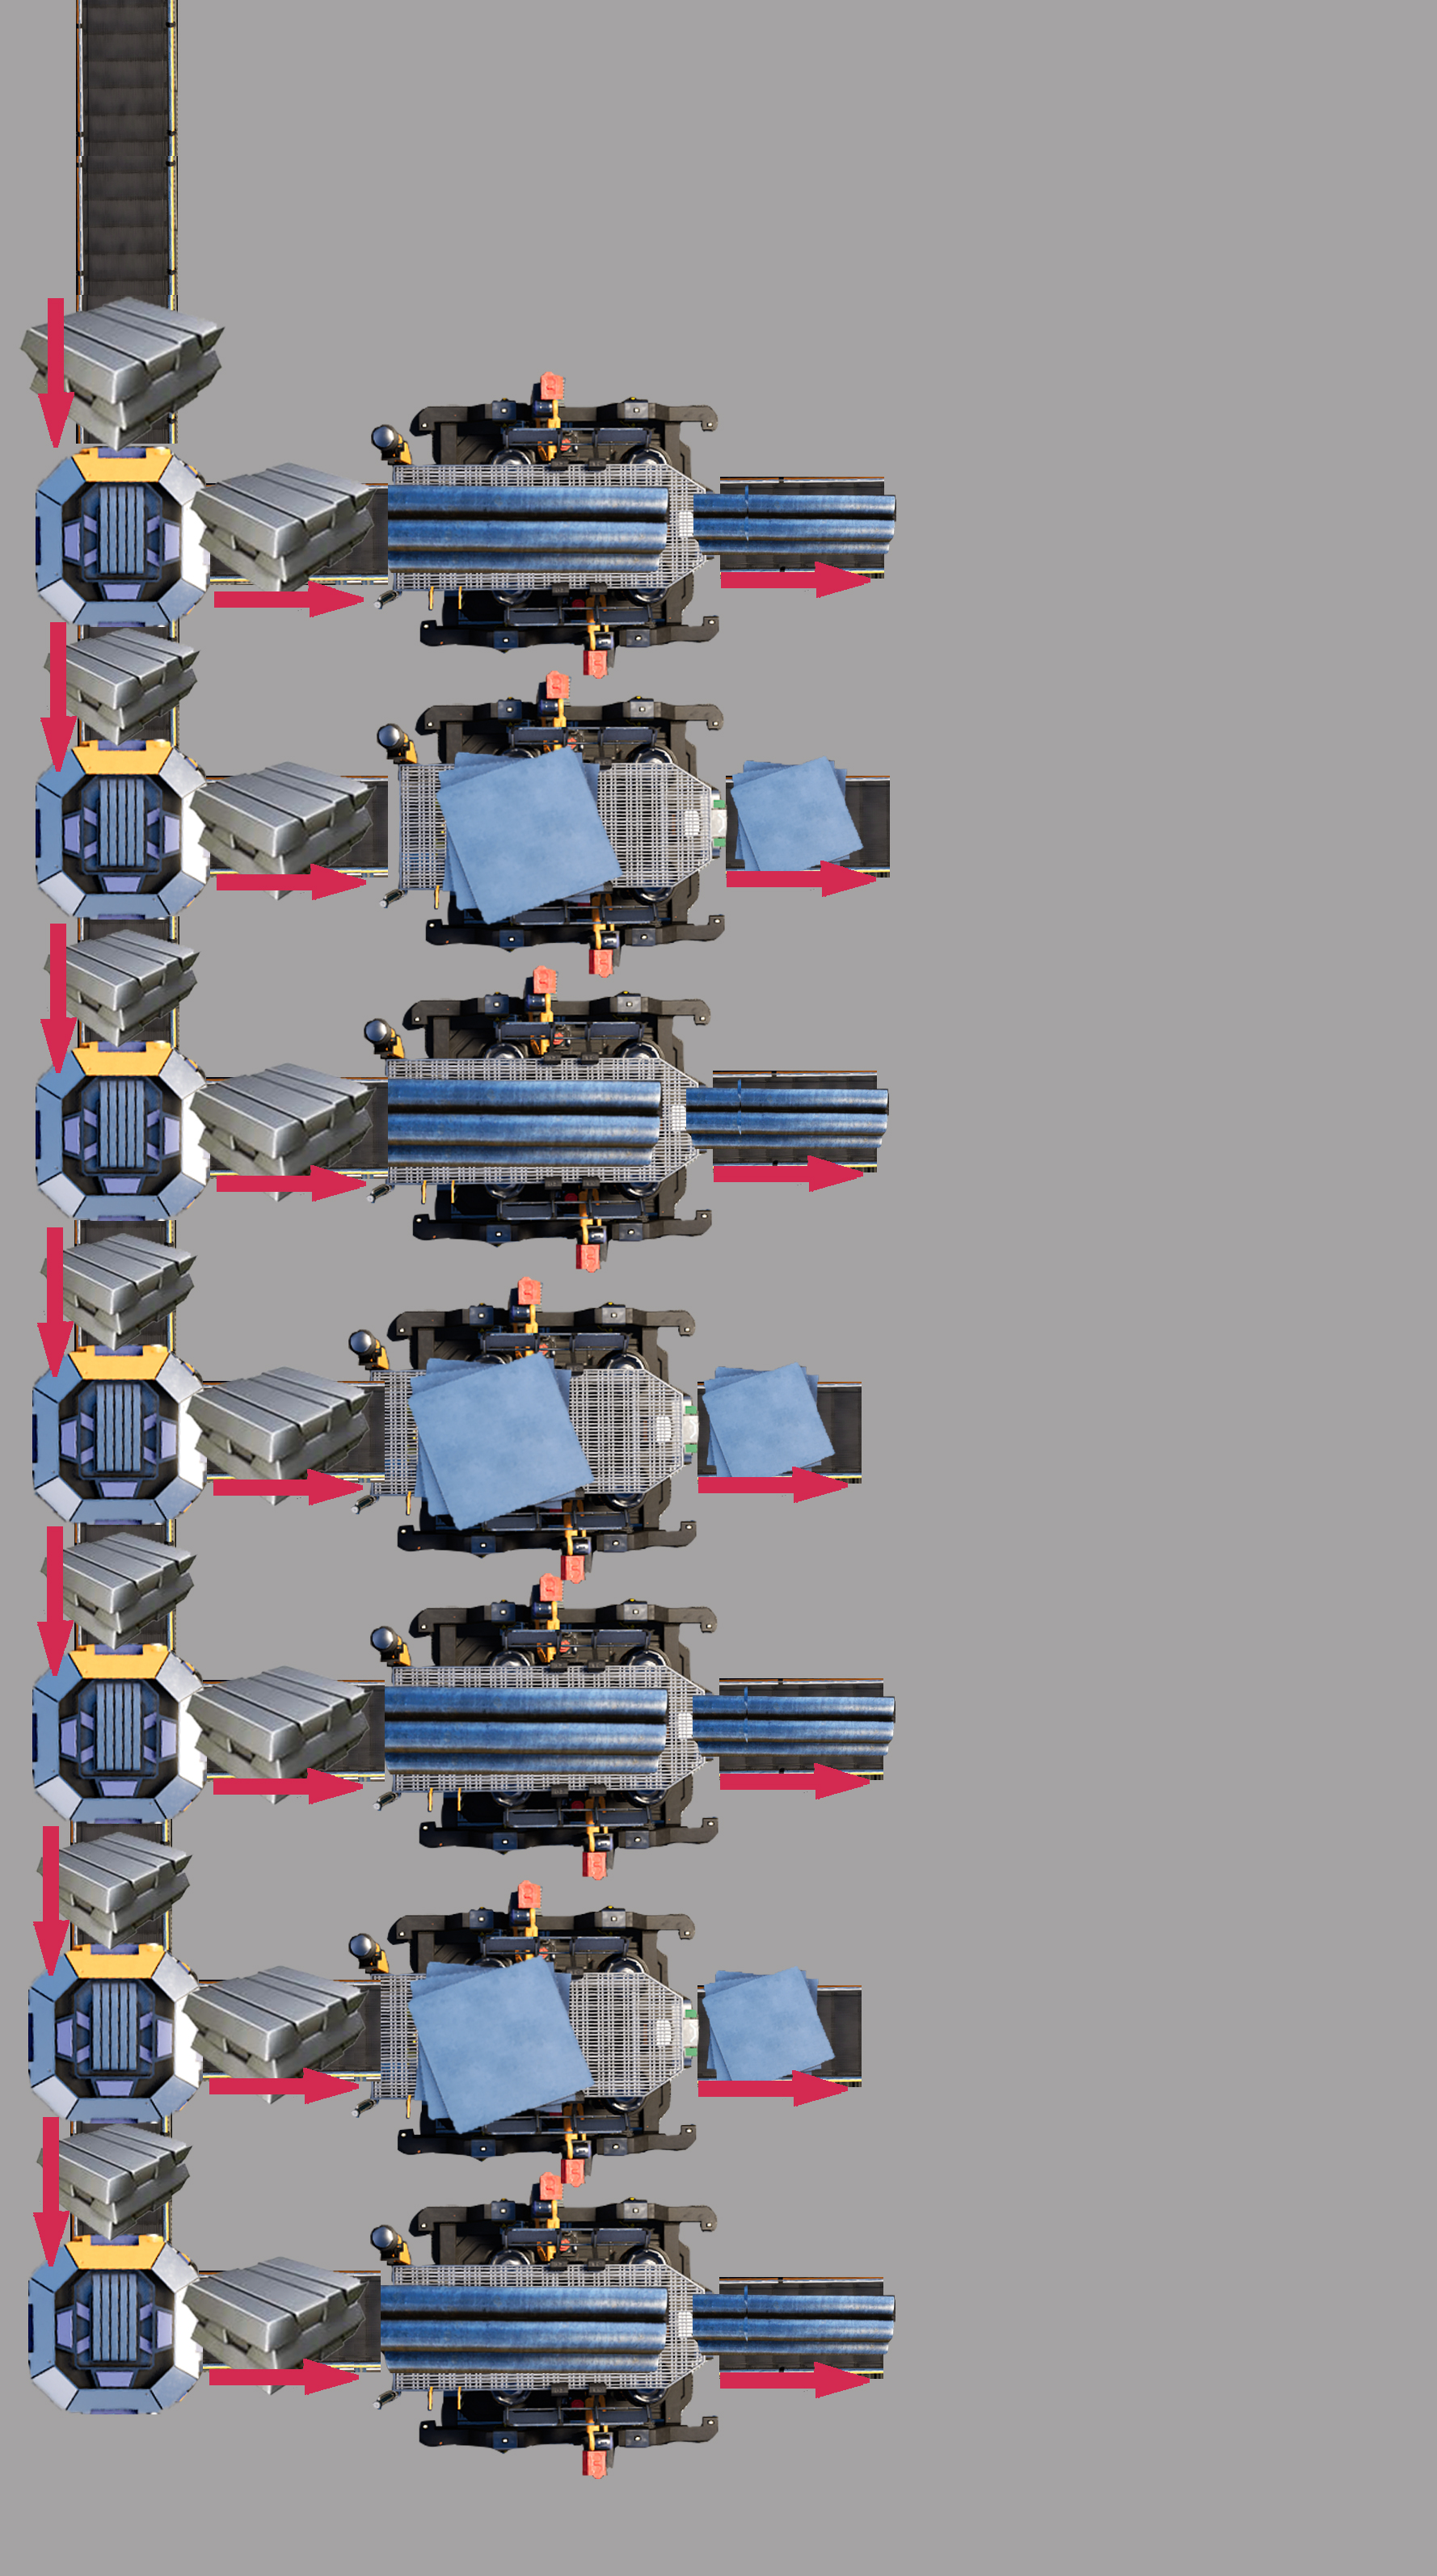
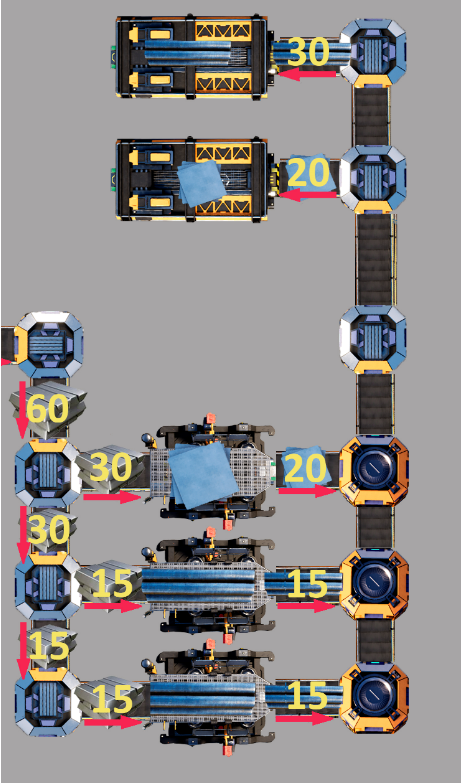
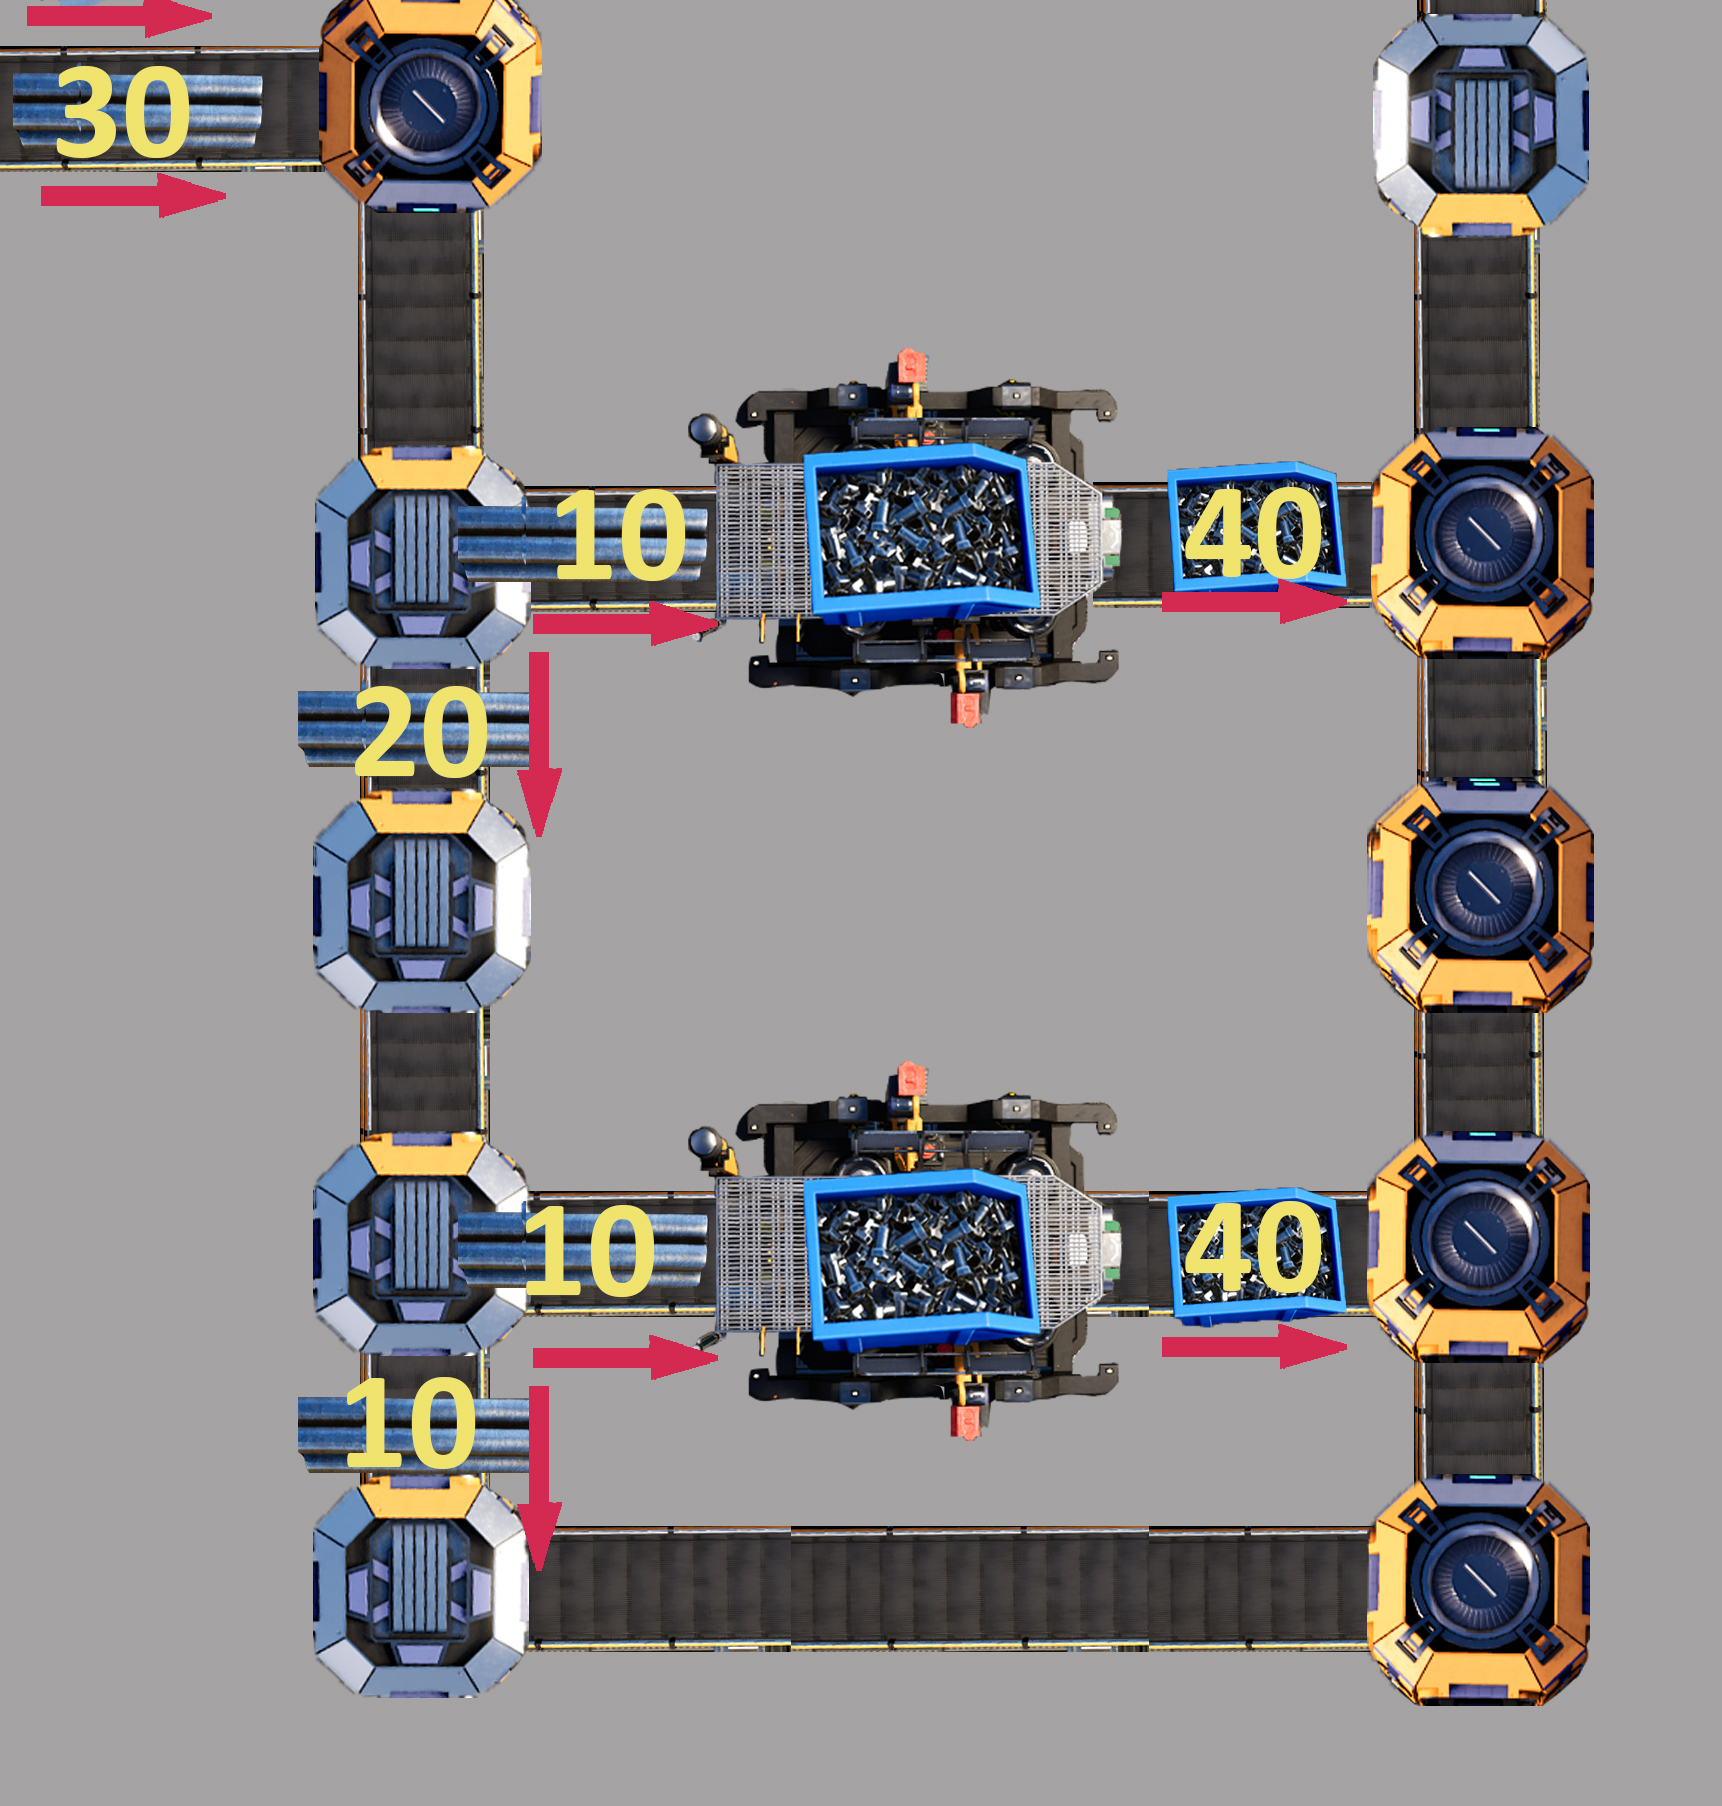
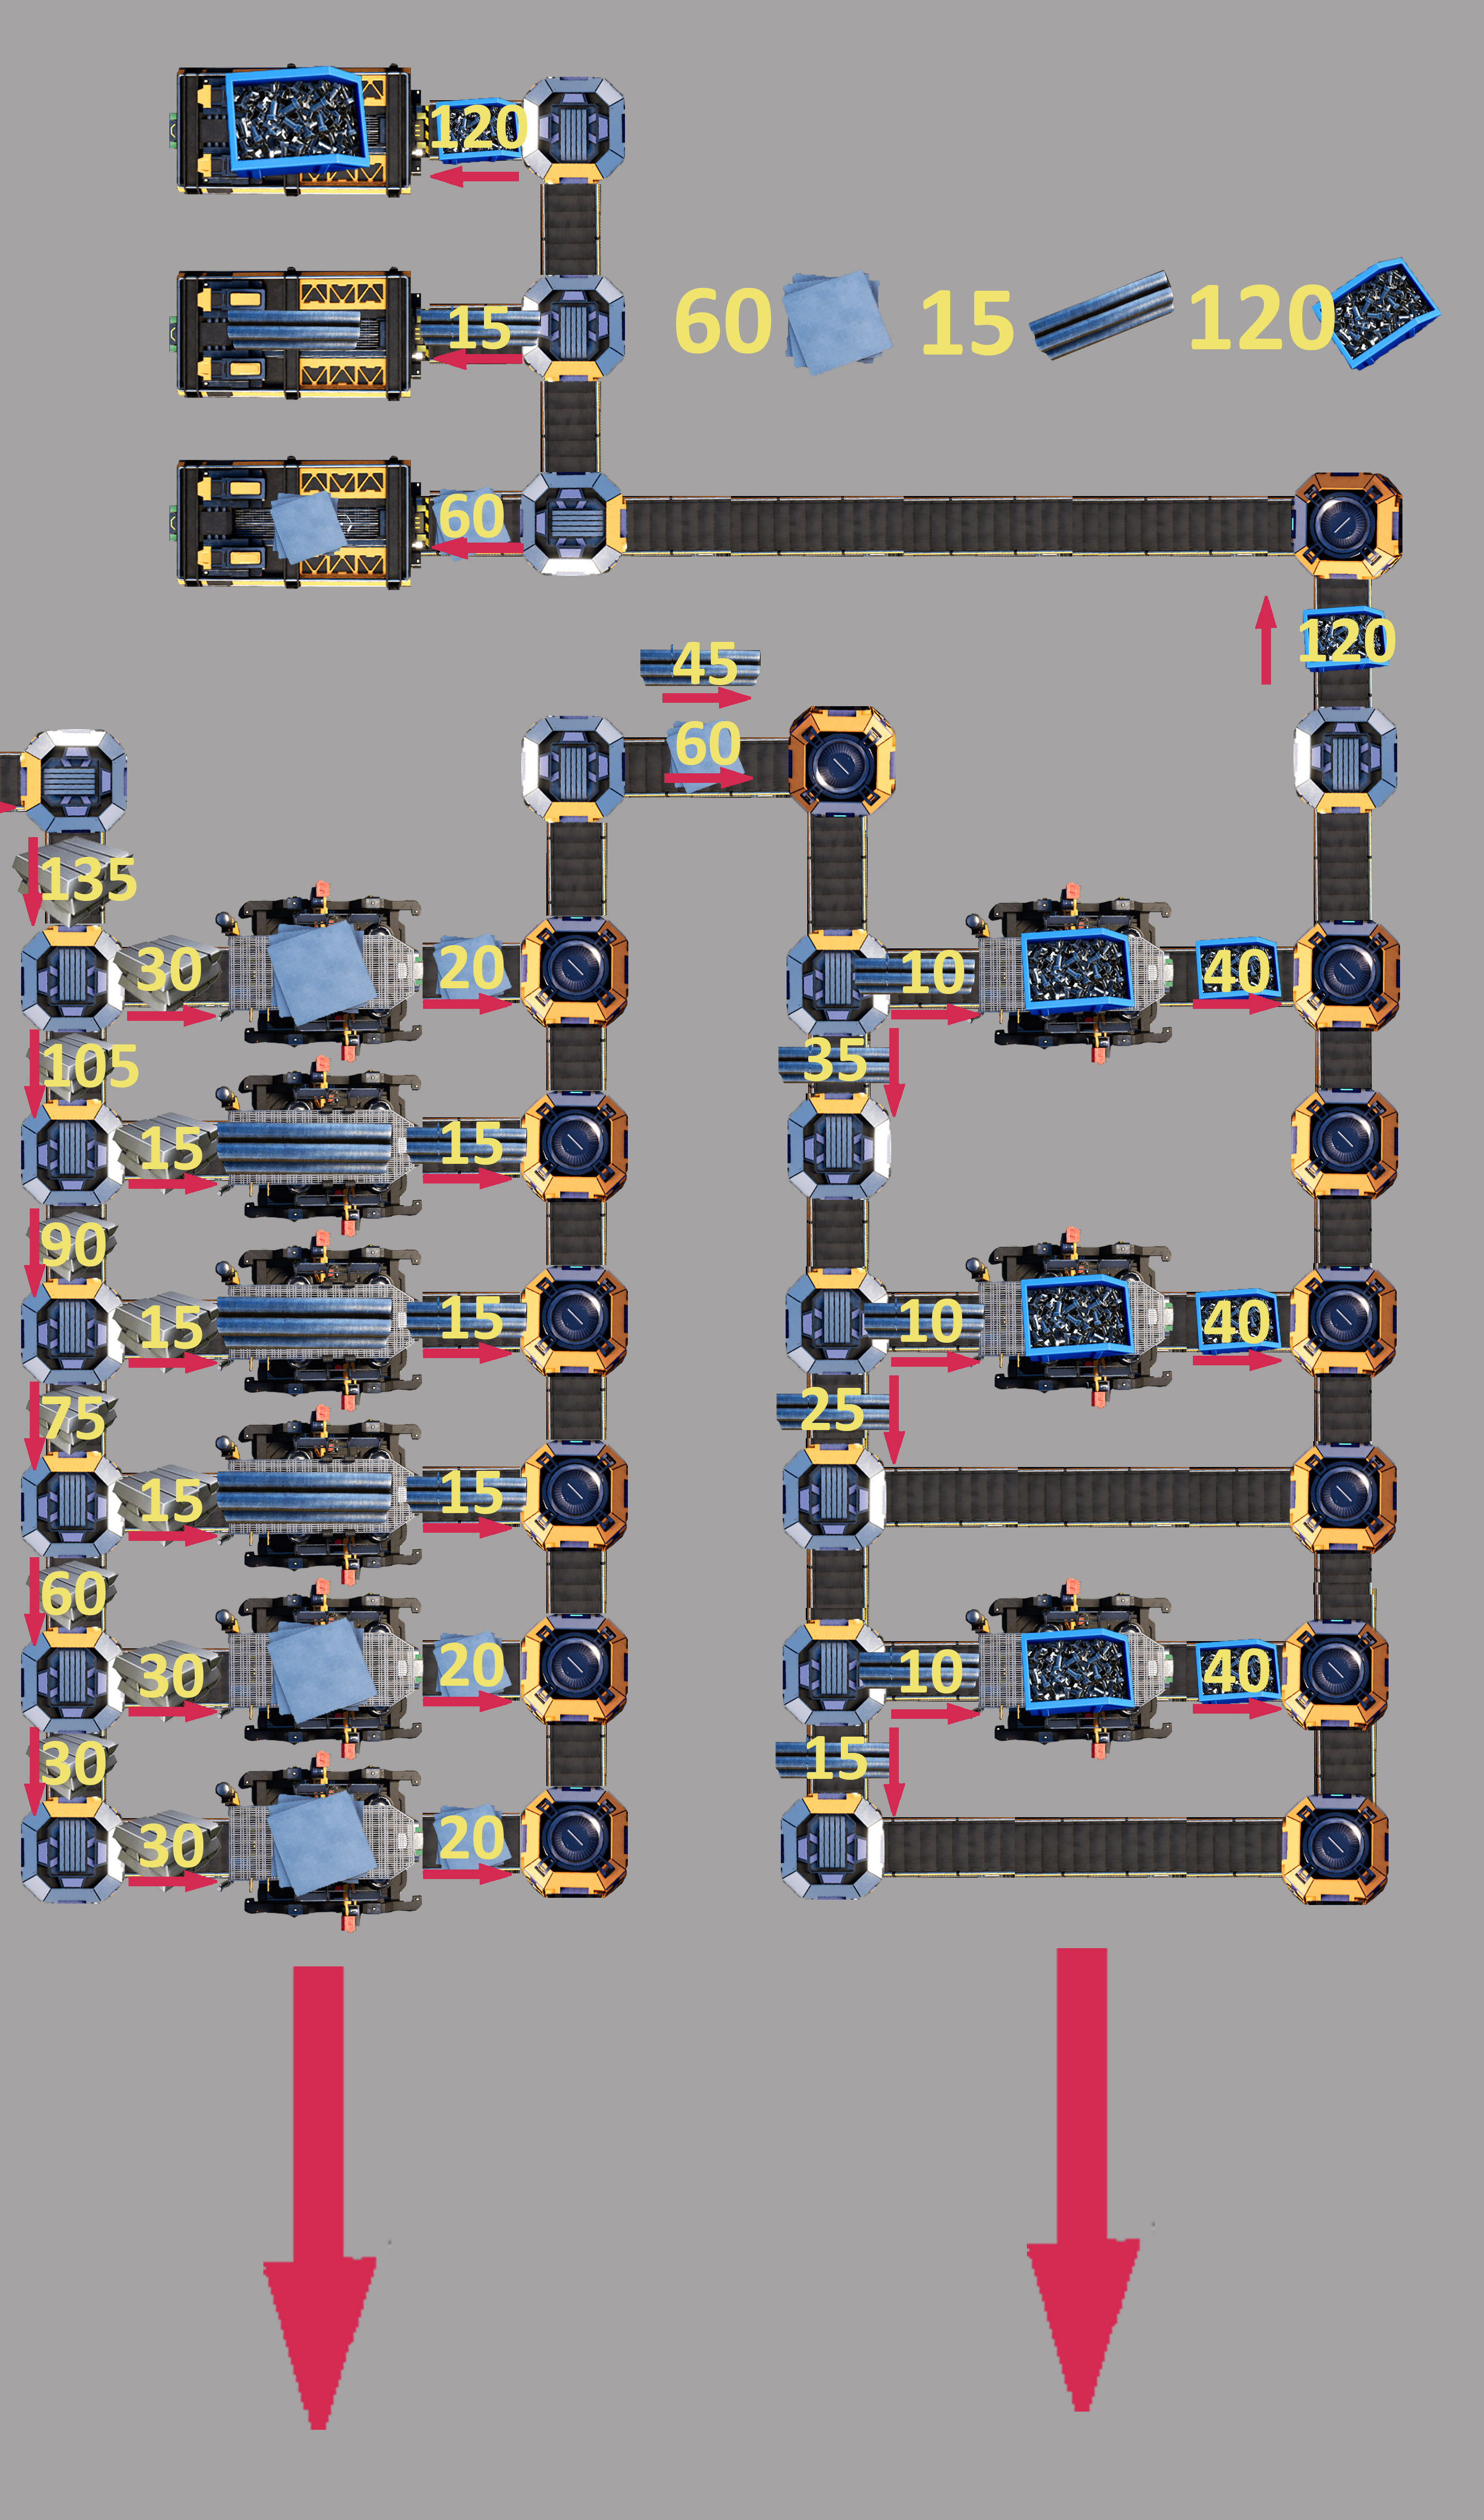
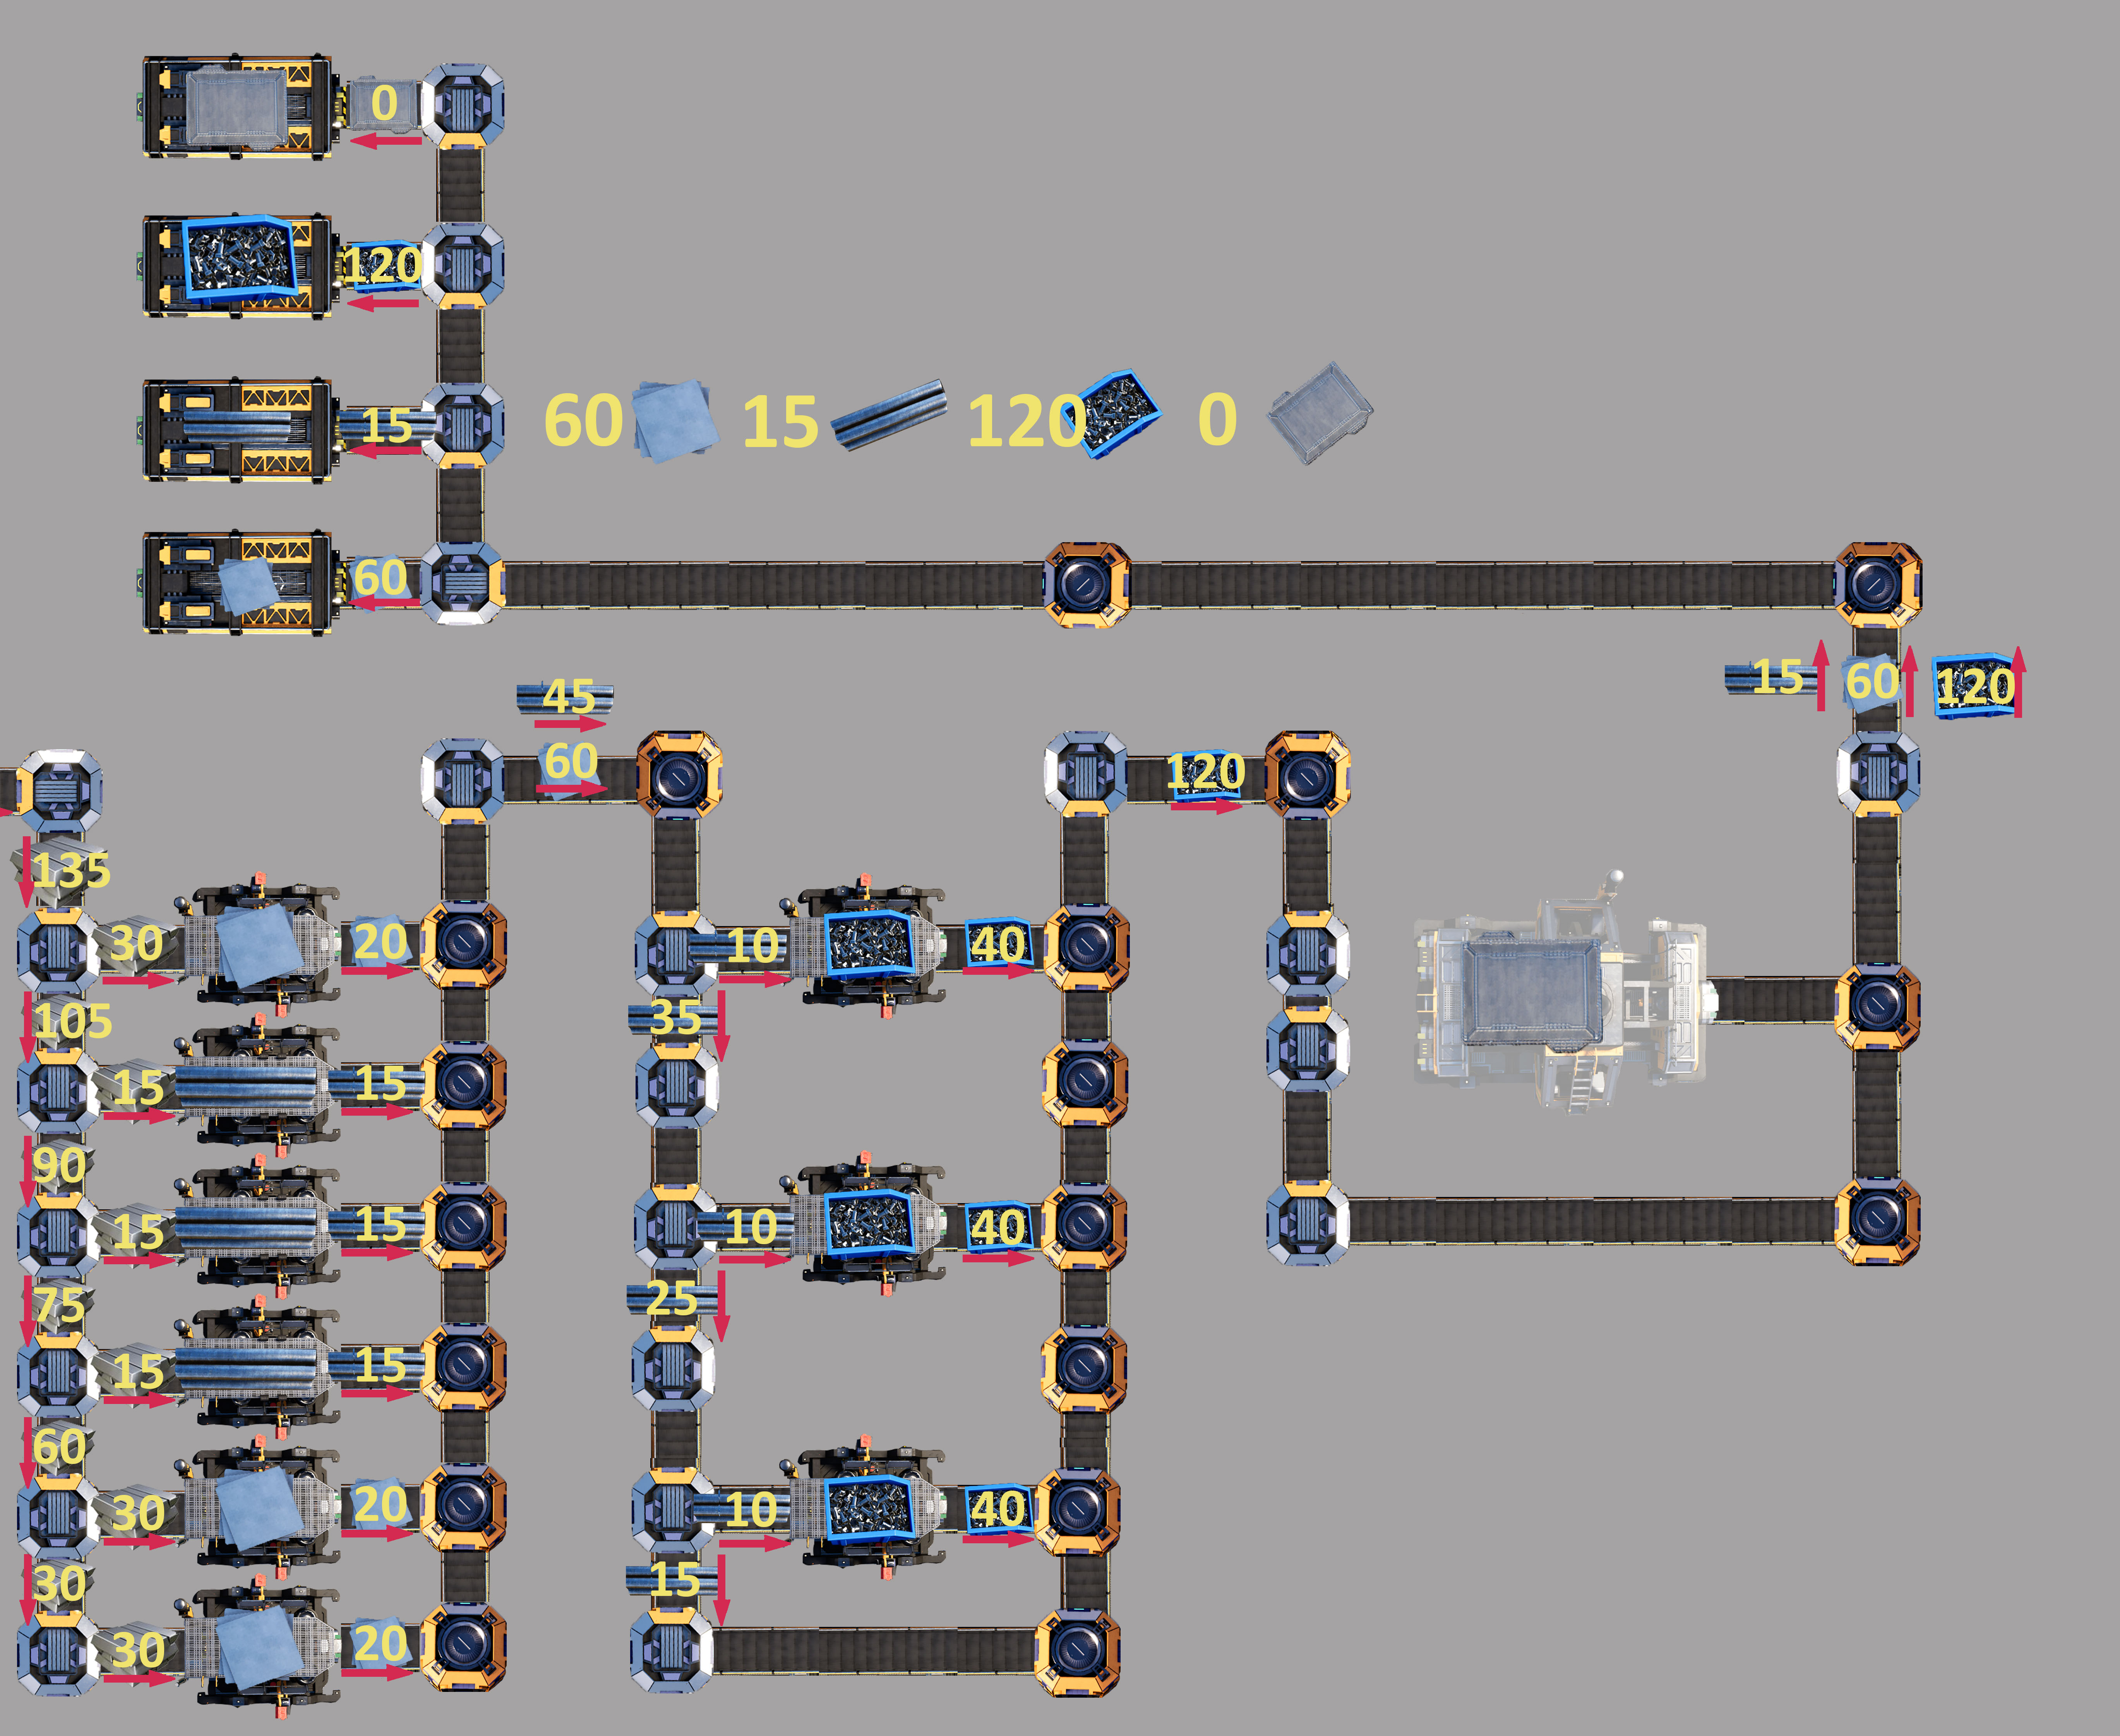
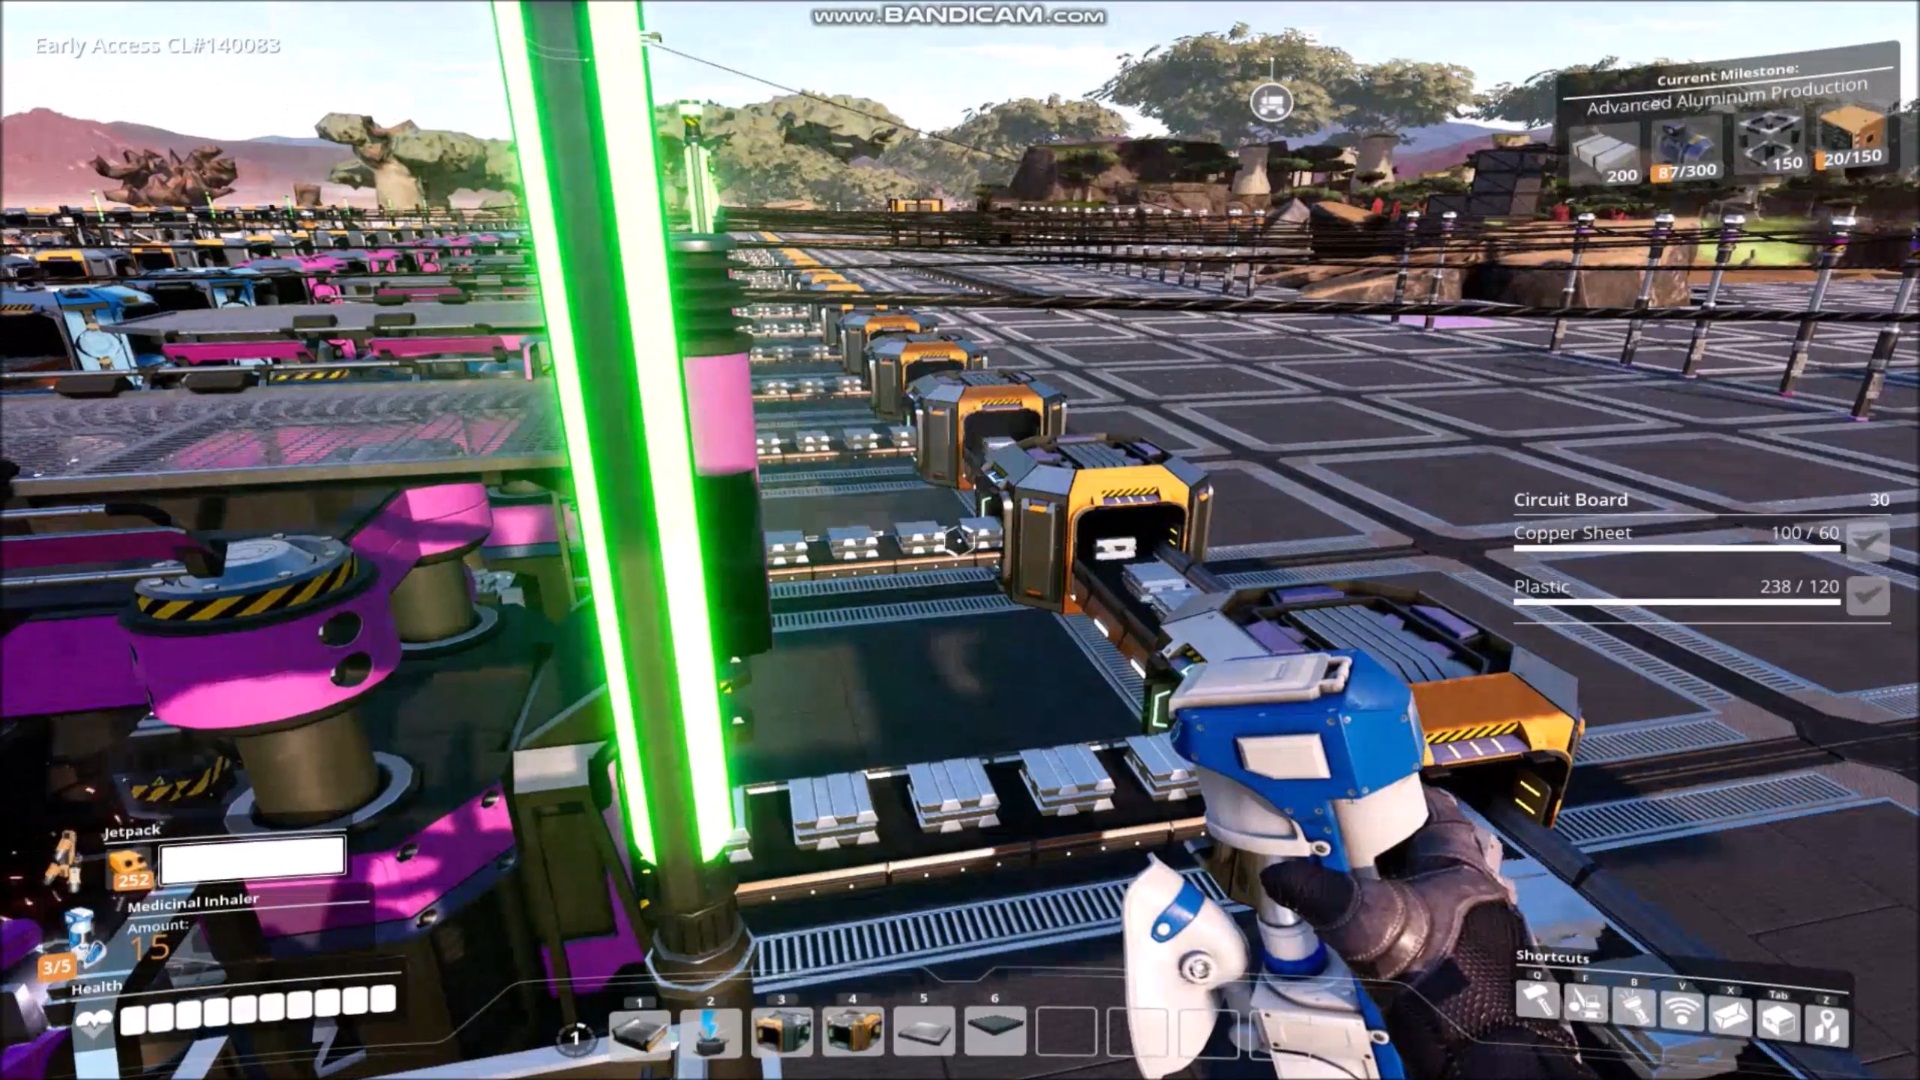
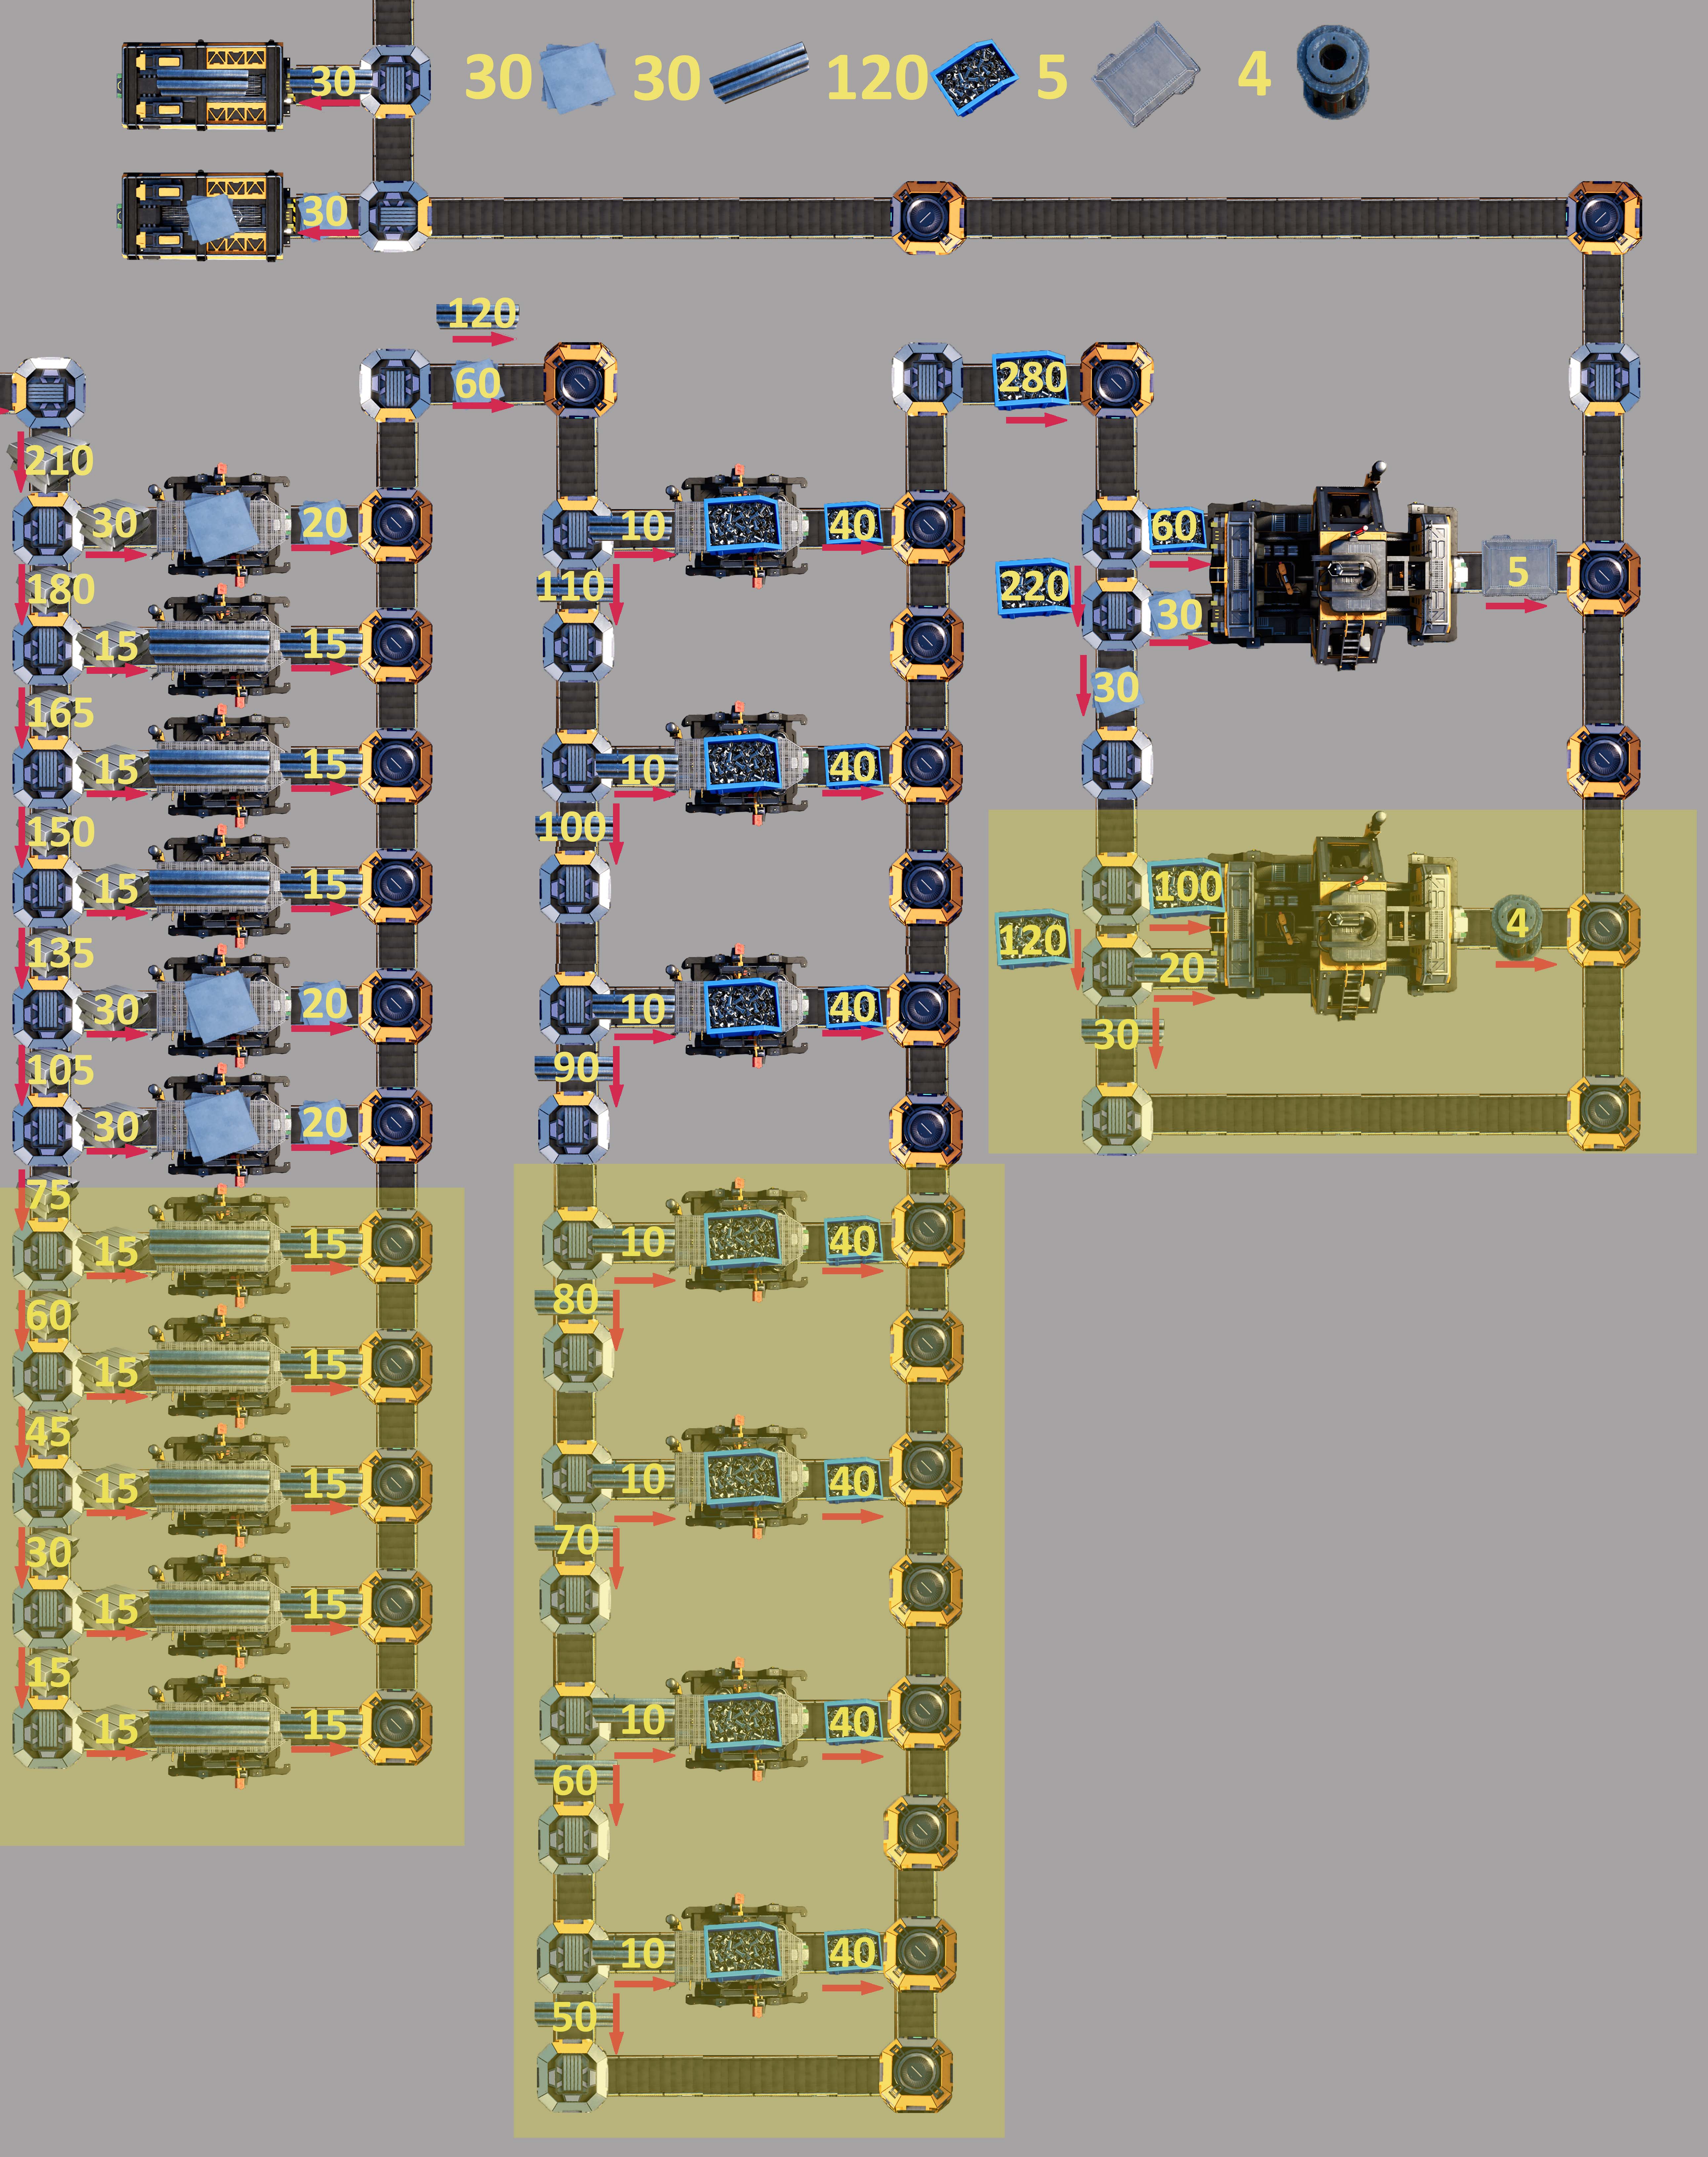
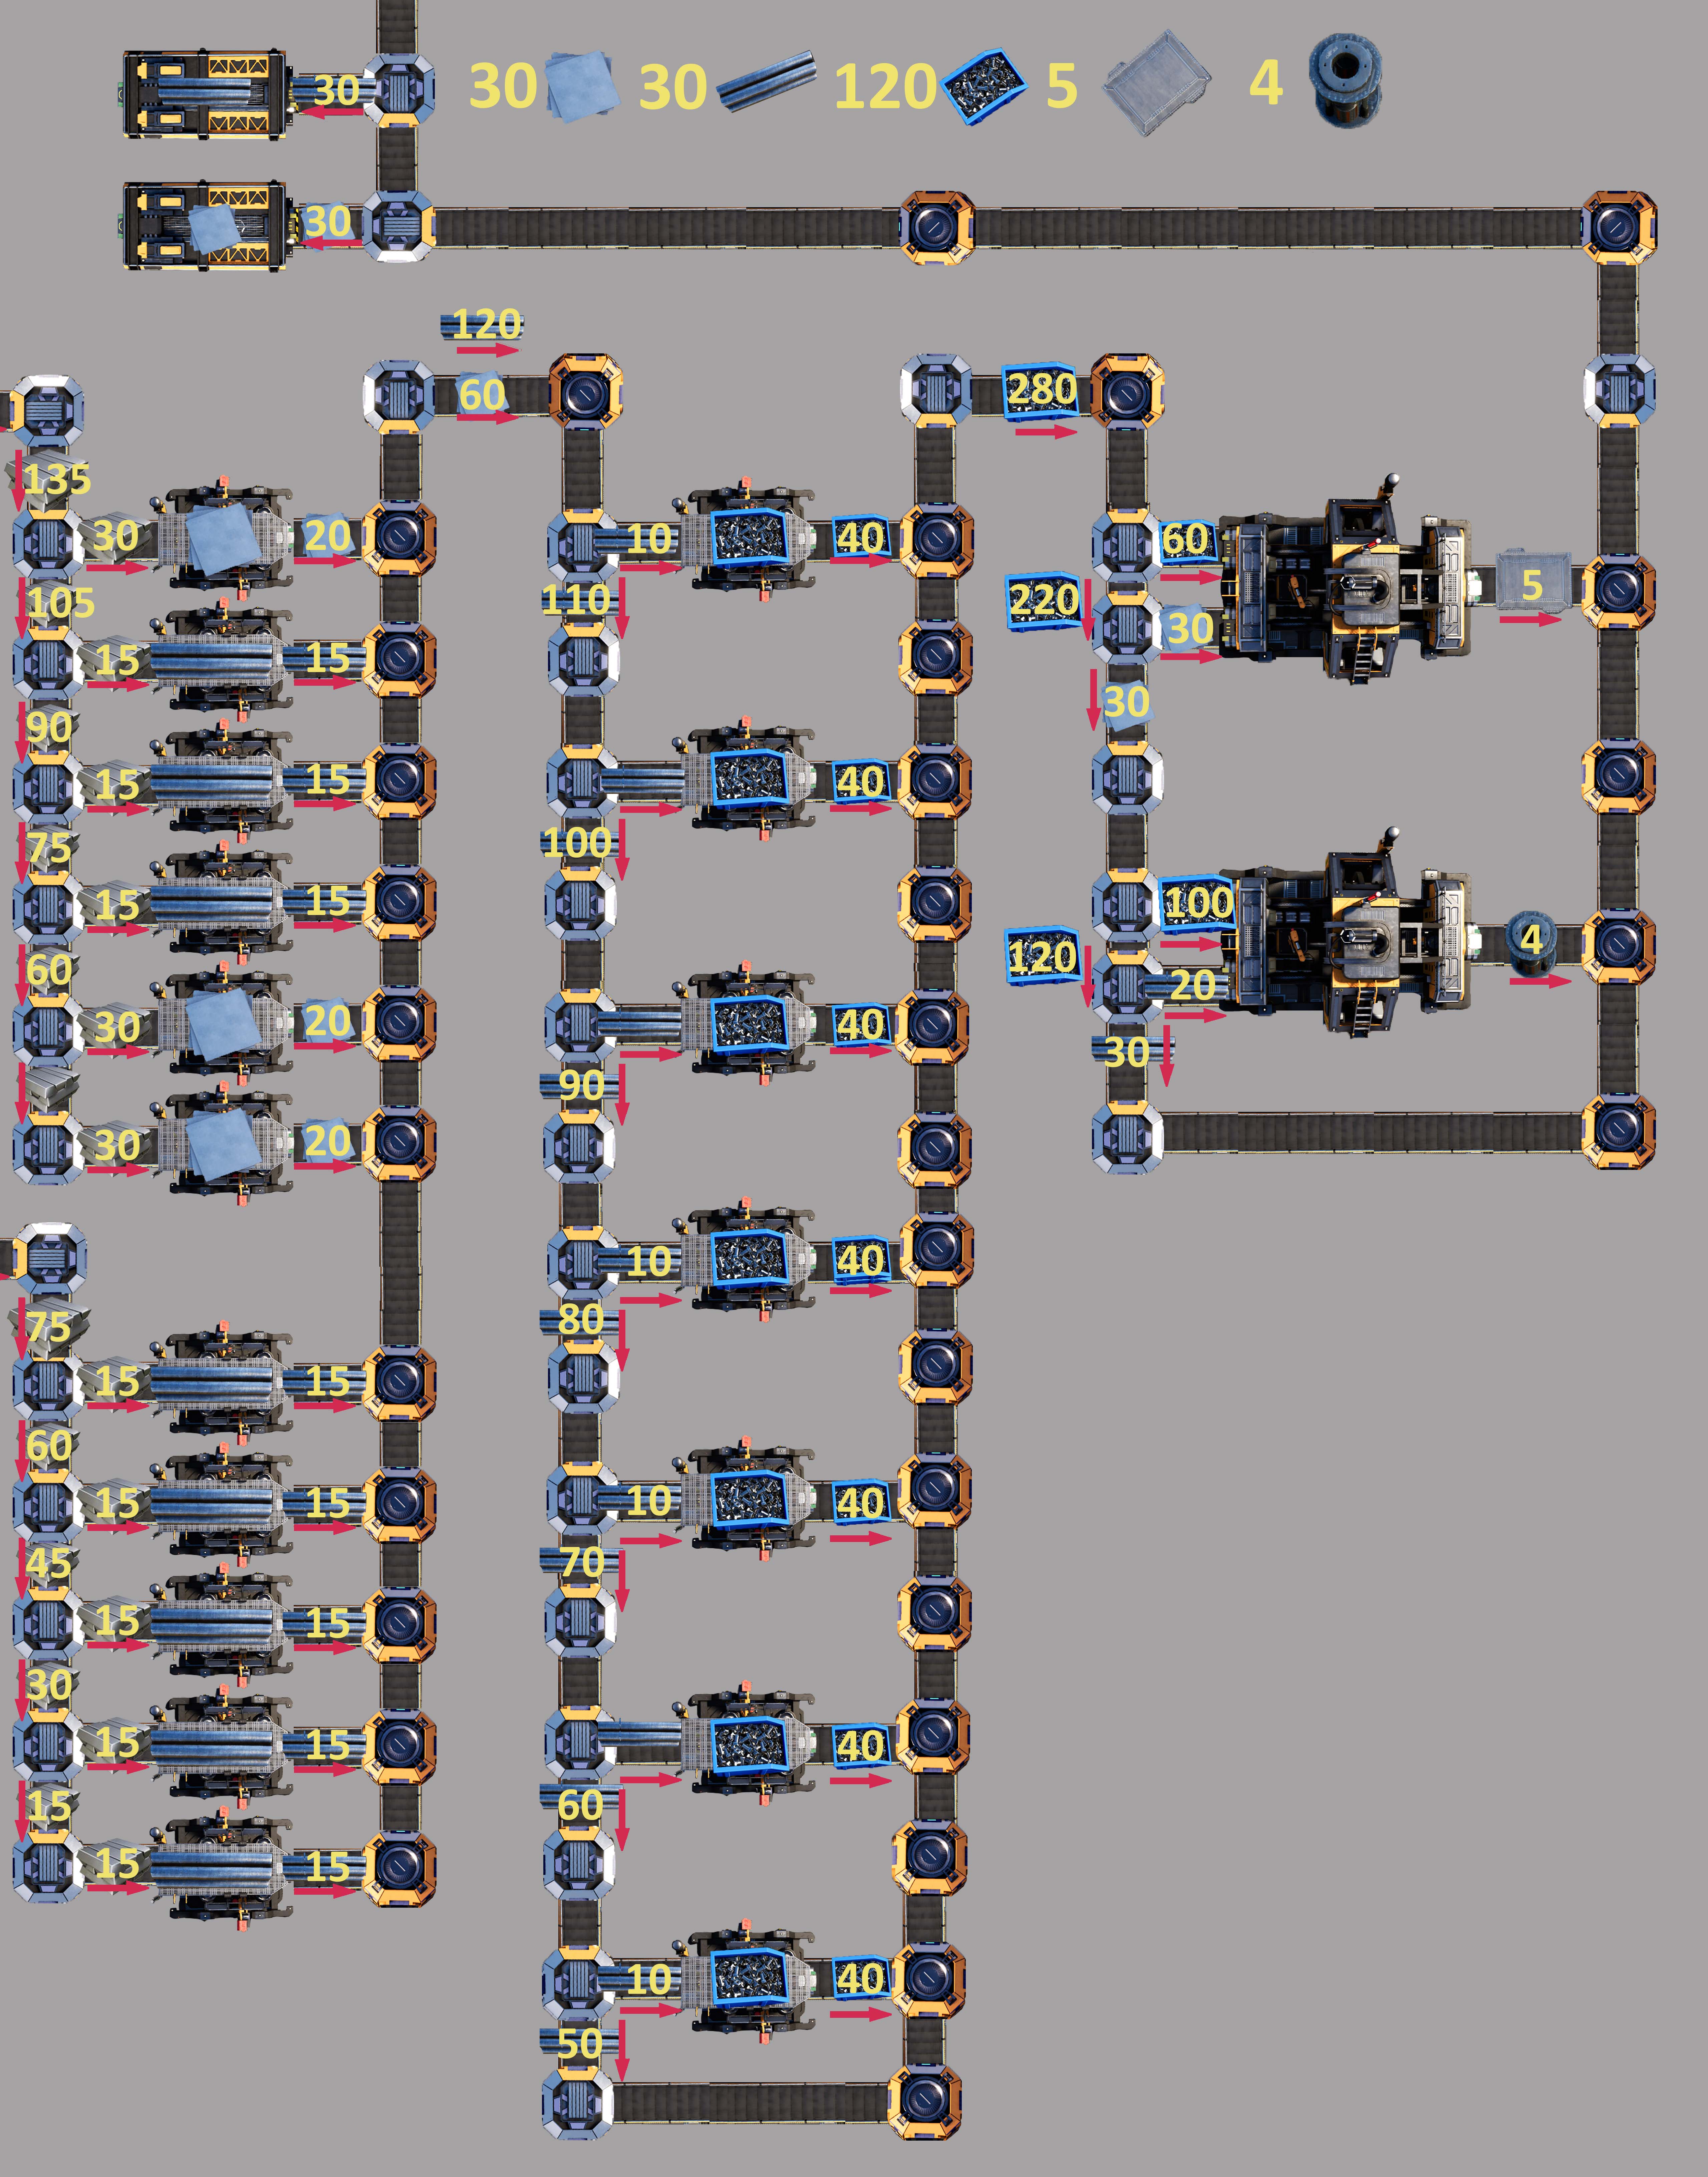
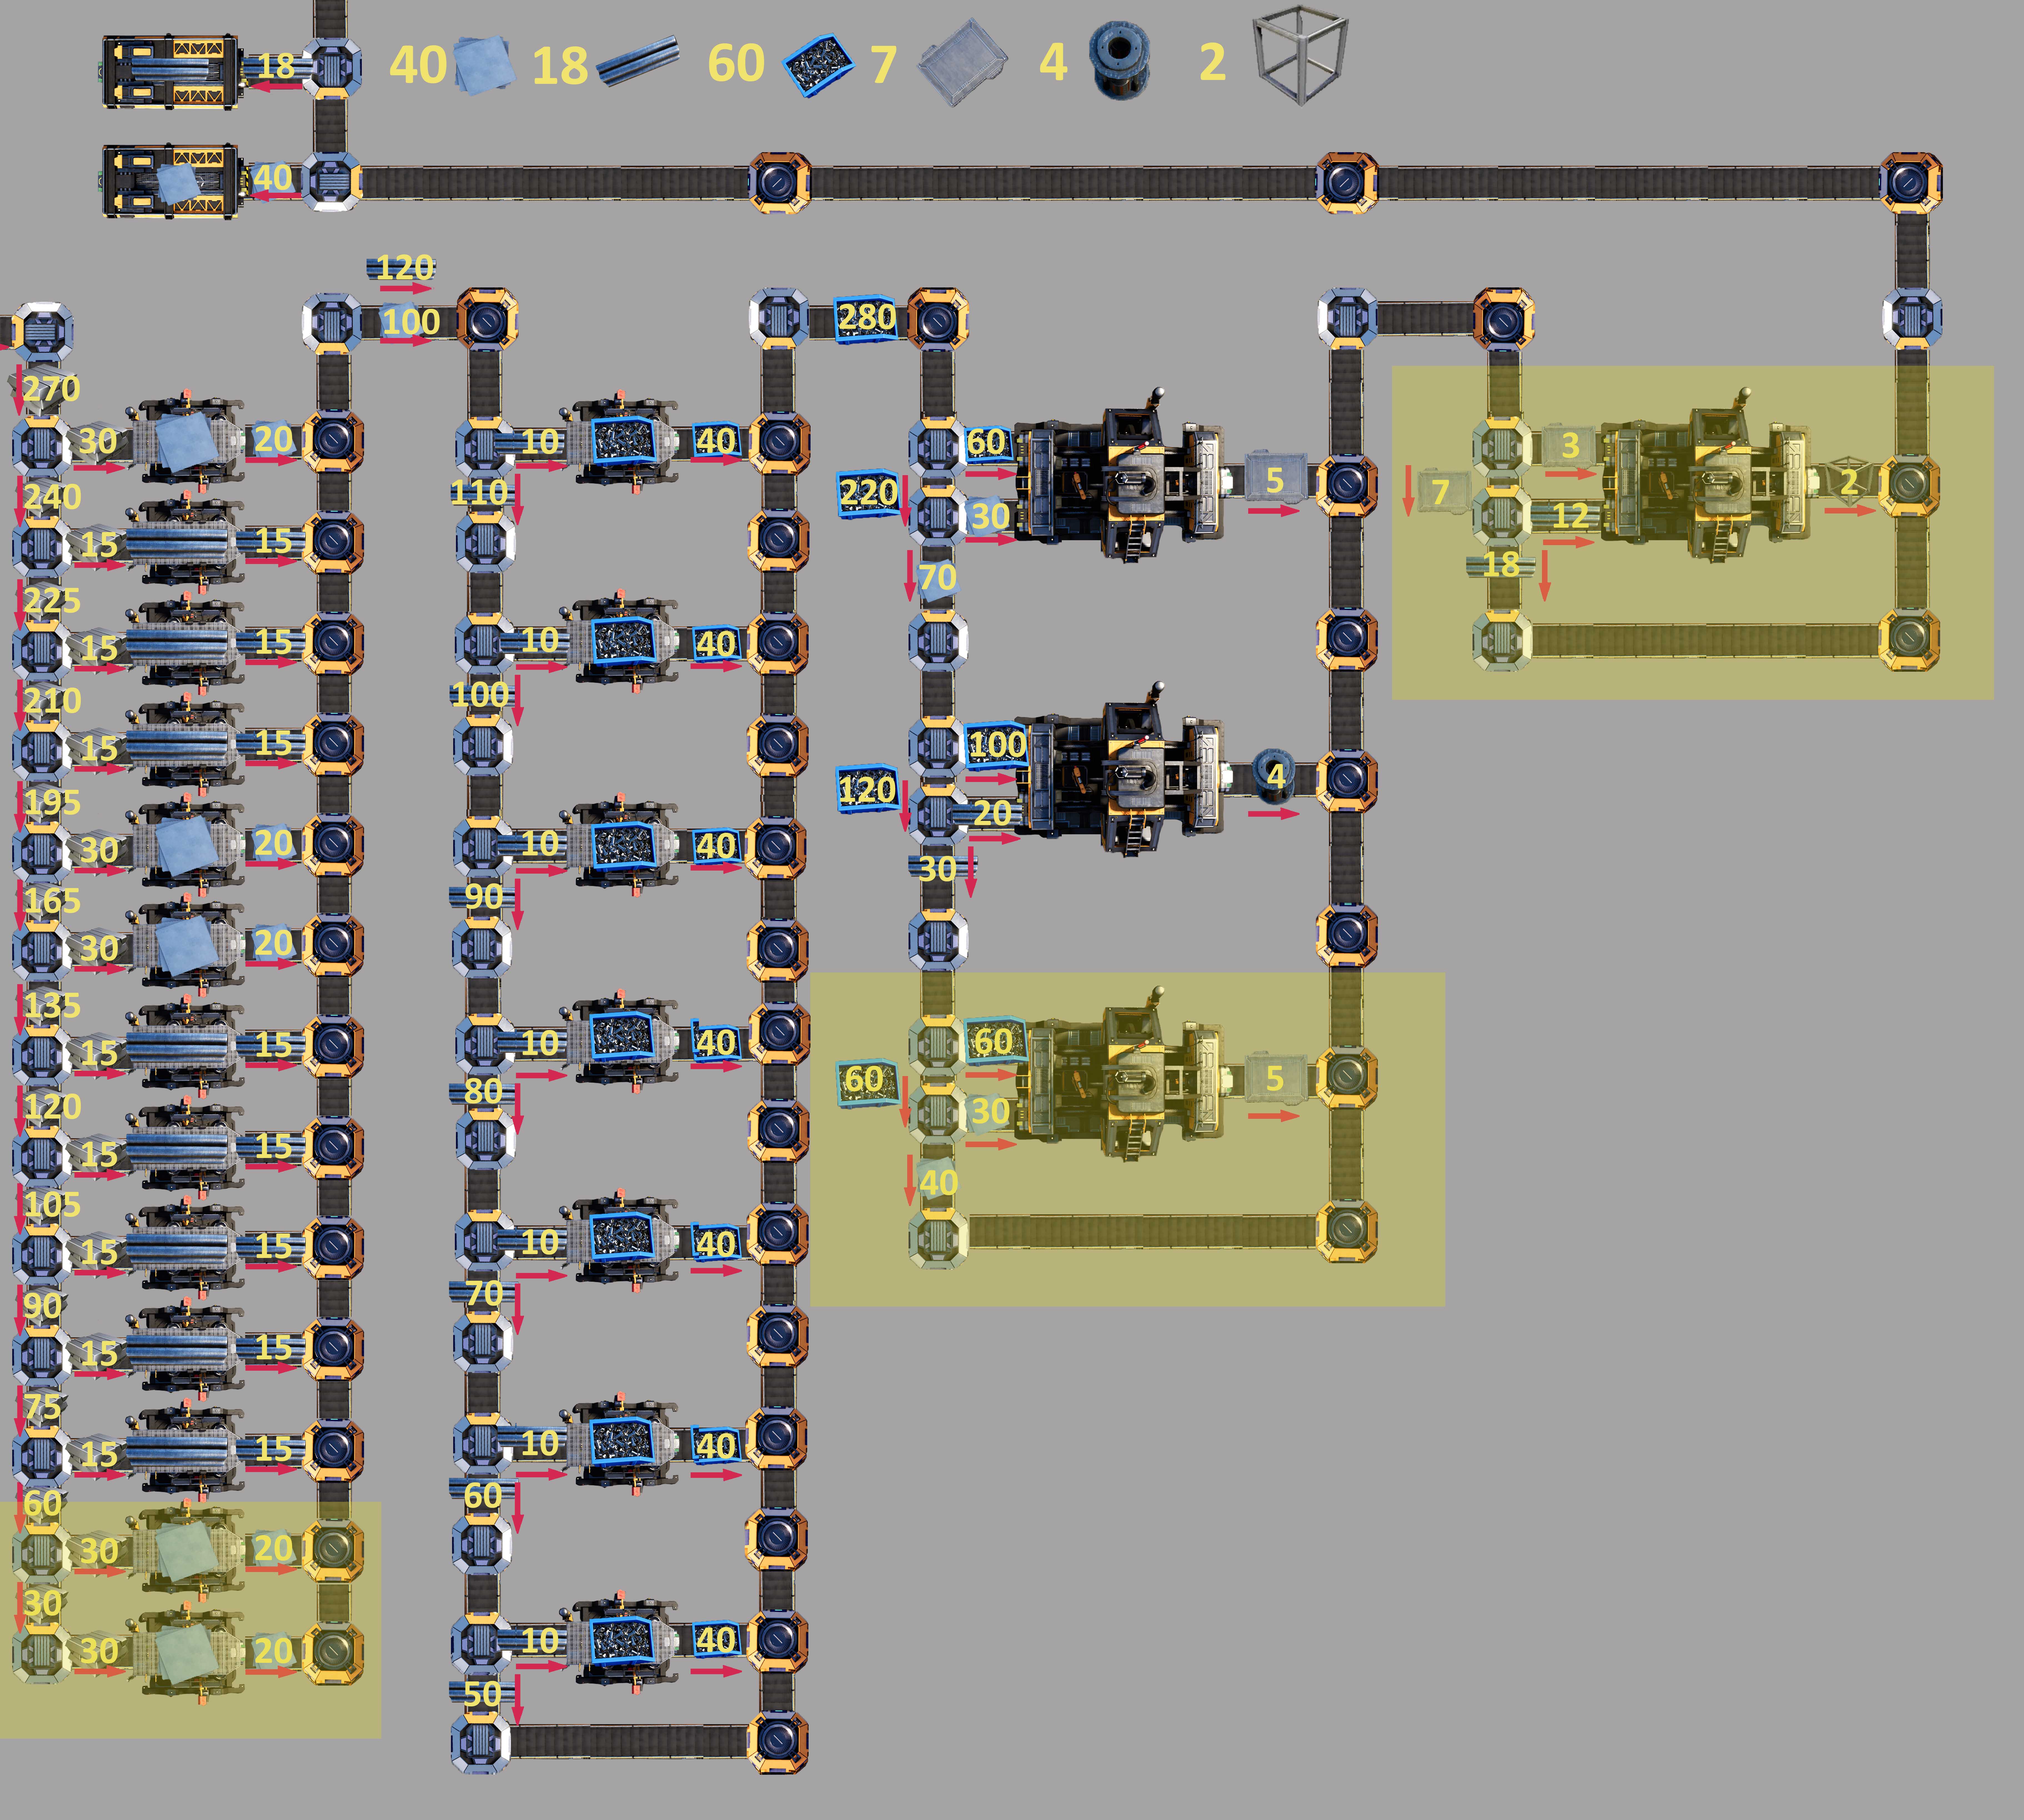
In the "adding level 3-5 resources" section’s schemas, players indeed need to have the conveyor belt Mk.3 to reproduce pictures on schemas exactly as you correctly noted. Because the amount of resources on the screws layer exceeds 120 items per minute. This is the only layer that can't be reproduced exactly as schemas show without conveyor belt Mk.3 except the last section schema (keep in mind that rods and plate layers are separated and carry resources independently).
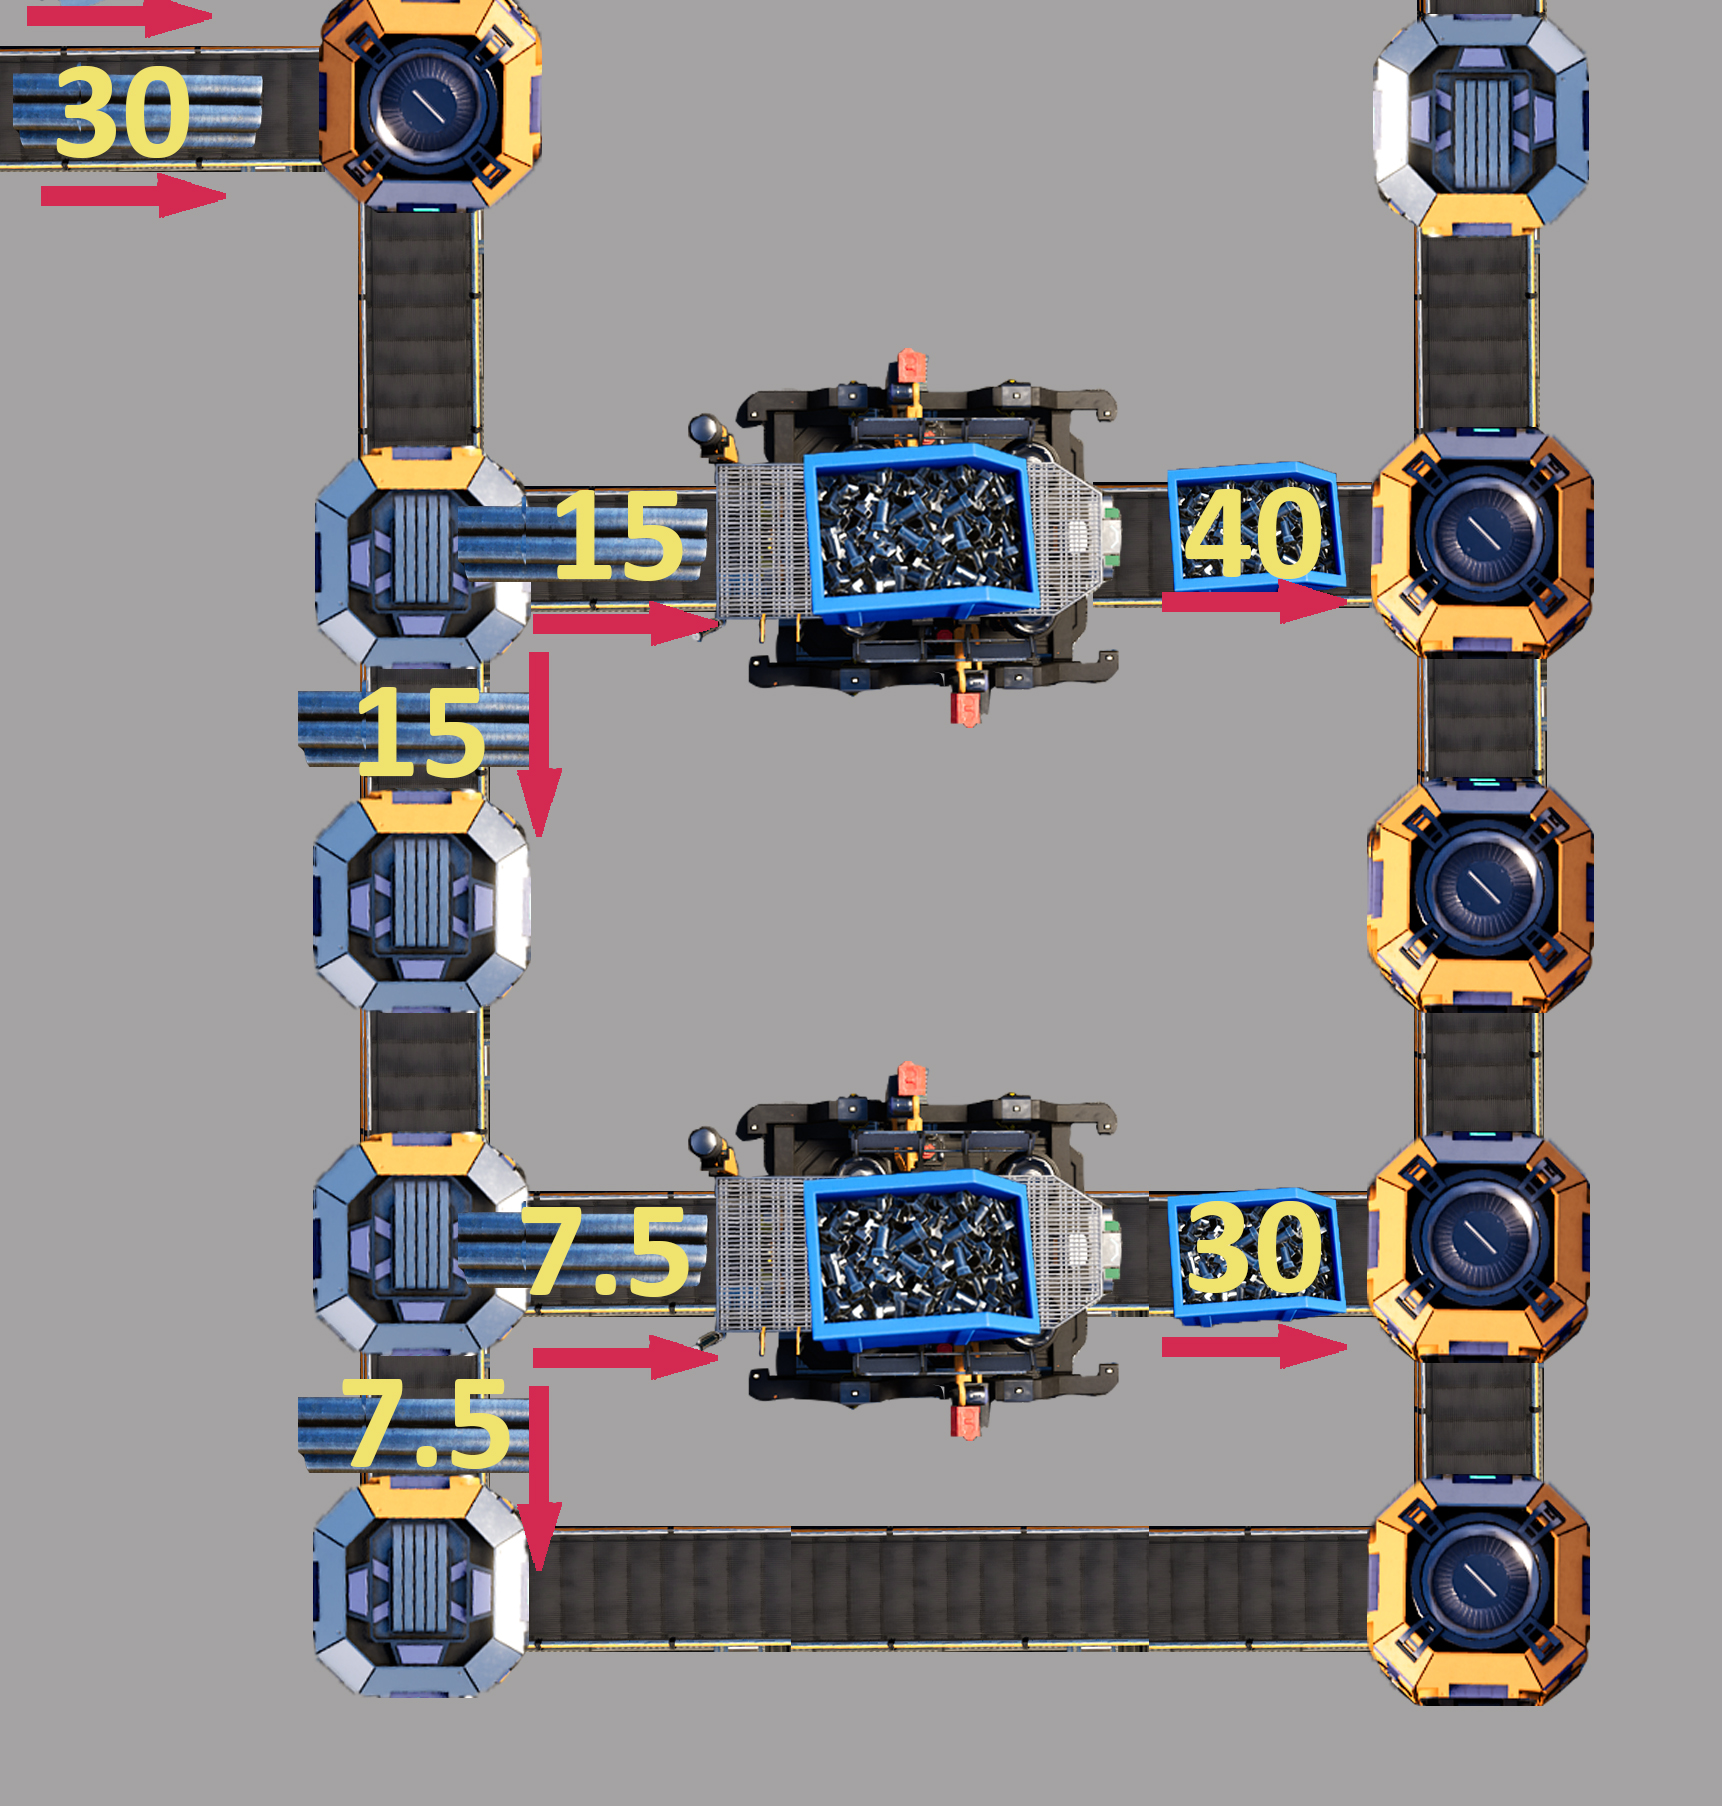
But still there is a workaround with Conveyor Belt Mk.2 I described in the video version of the guide at timecode 14:39: https://youtu.be/nuNzgw06ews?t=879 to replicate all schemas in this section.
Part (2/6)
satisfacultist  [készítő] 2021. nov. 5., 23:05 
UltimateBeast, thank you for remarks and close attention to the guide content.

Let me clear some things:
1. There is no issue to get the conveyor belt Mk.2 at the very beginning of the game. The only thing that prevents players from unlocking the conveyor belt Mk.2 is Tier 0 after completing of which Tiers 1 and 2 get unlocked with the ability to unlock their milestones in any order, including Logistic Mk.2 milestone.
When I started to play for the first time I had crafted all resources required for Tier 0 milestones manually within less than an hour using the craft bench only. But for more experienced factory builders there is an option to start a new session with the "Skip Intro" checkbox selected. In this case players will start the game with Tiers 1 and 2 opened and have the ability to start right from Logistics Mk.2 Milestone unlocking.
My reply is too long for a steam comment so it will be splitted into 6 parts with some delay because Steam forbid frequent posting
Part(1/6)